

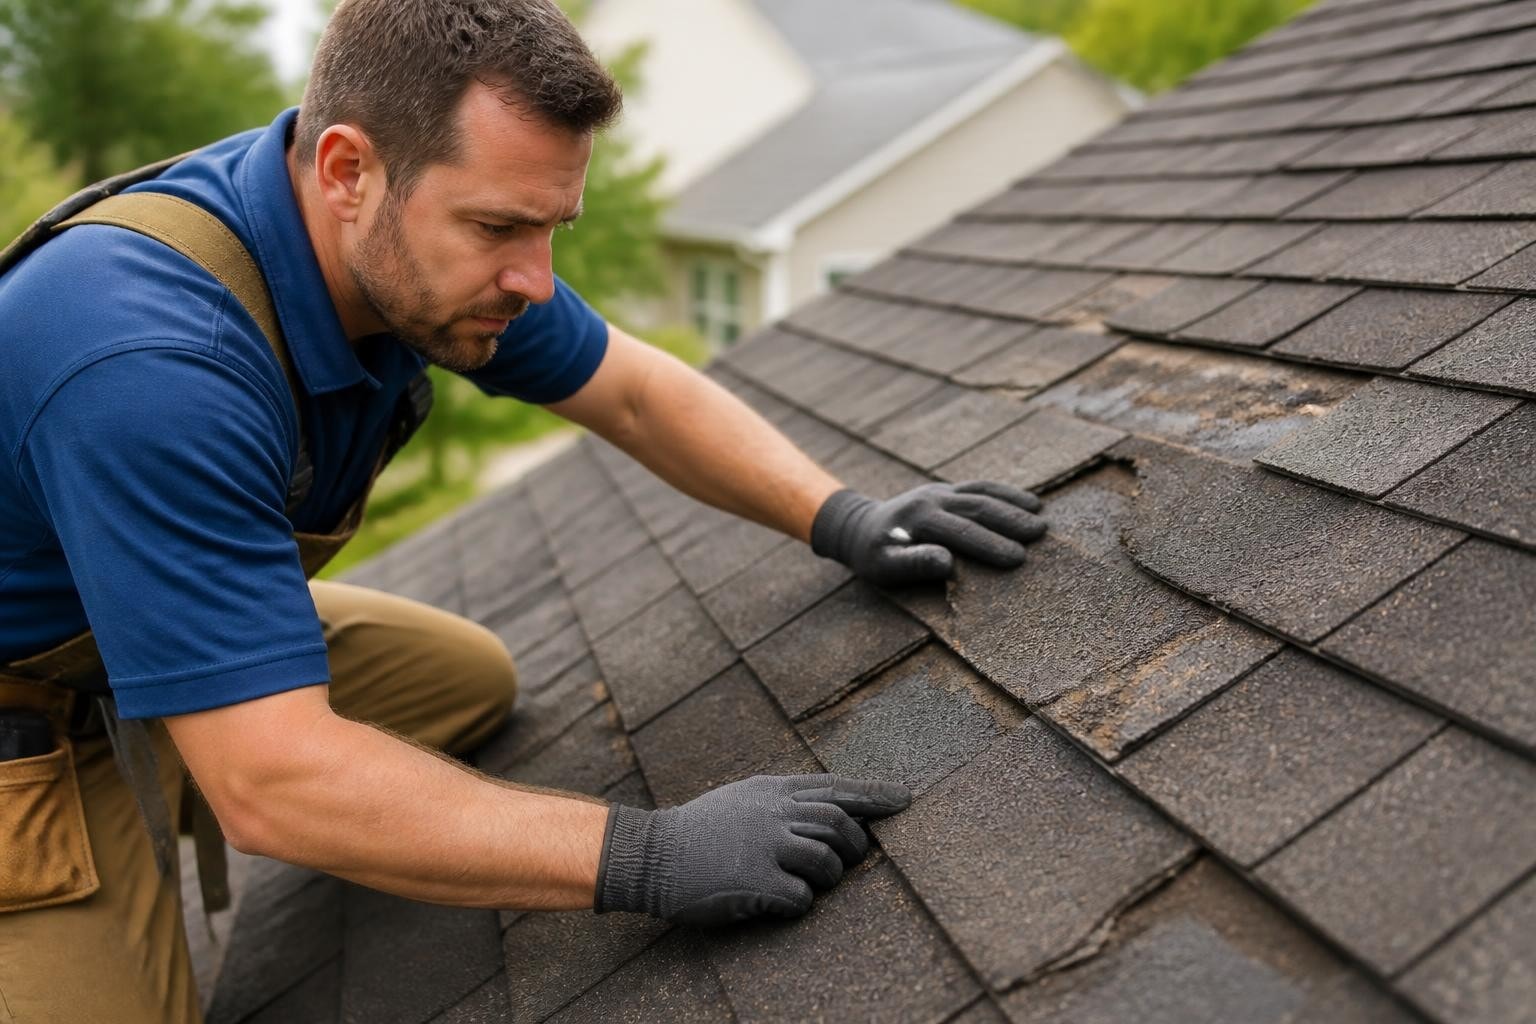
Asphalt shingle roofs remain the most popular roofing choice for residential properties across America, covering approximately 80% of homes. These durable systems can last 20-30 years with proper maintenance, but even the best-installed roofs eventually need repairs. Whether from storm damage, age-related wear, or installation defects, understanding how to properly address shingle damage protects your investment and prevents costly interior damage. This comprehensive guide explores everything homeowners need to know about maintaining and repairing their asphalt shingle roofing systems.
Understanding Common Asphalt Shingle Damage
Asphalt shingle roof repair begins with accurate damage assessment. Different types of damage require distinct approaches and levels of urgency.
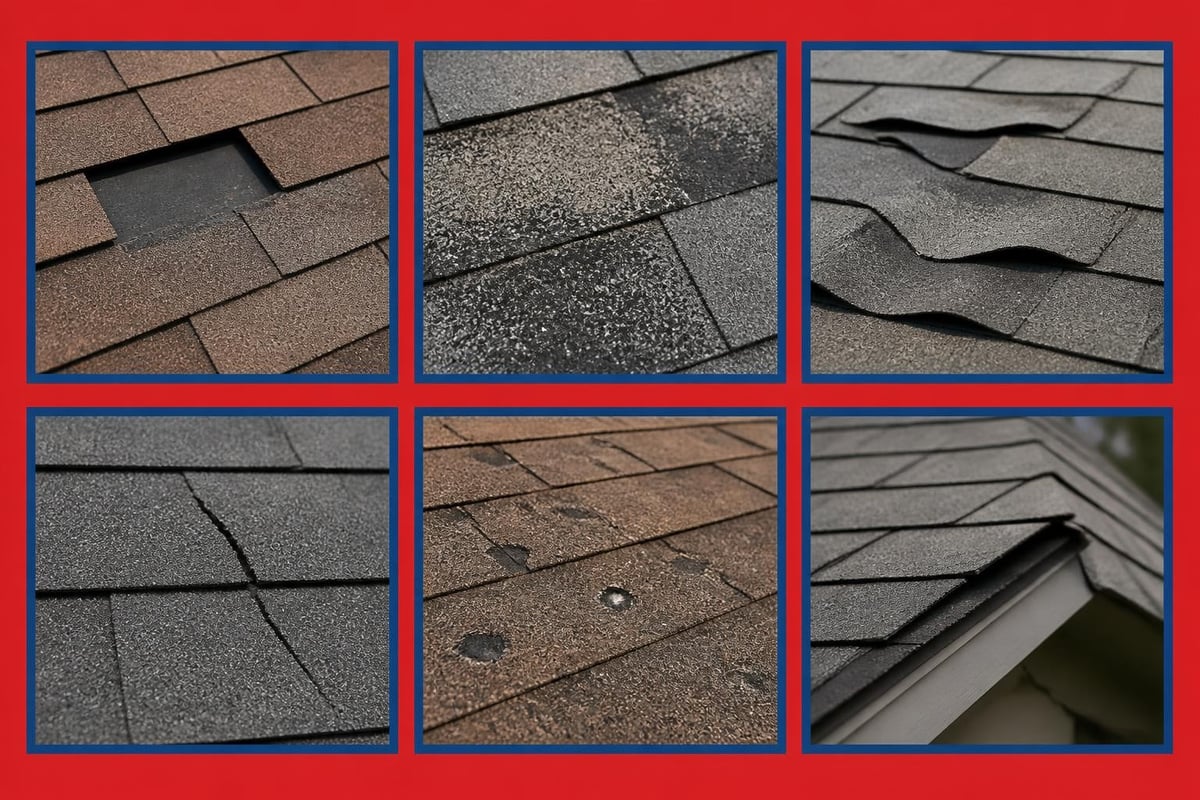
Missing shingles represent the most obvious problem homeowners notice. High winds, improper installation, or deteriorated adhesive can cause shingles to blow off entirely, leaving underlying materials exposed to the elements. This type of damage demands immediate attention to prevent water infiltration.
Weather-Related Deterioration
Storm damage takes many forms beyond missing shingles. Hail creates distinctive circular bruises or cracks that compromise the protective granule layer. Wind-driven debris can puncture or tear shingles, while ice dams force water underneath the shingle overlap during winter months.
- Granule loss appears as bare patches where the protective coating has worn away
- Curling edges indicate aging or poor ventilation problems
- Cracked shingles result from thermal expansion and contraction cycles
- Lifted corners suggest inadequate sealing or wind damage
- Blistering shows trapped moisture within the shingle layers
Temperature fluctuations cause significant stress on roofing materials. According to InspectAPedia’s roofing best practices, proper installation temperature and sealing techniques directly impact long-term performance and repair frequency.
When to Repair vs Replace Your Roof
Not every damaged shingle requires a complete roof replacement. Strategic asphalt shingle roof repair can extend your roof's lifespan by several years when addressed promptly.
Repair scenarios work well when damage affects isolated areas, typically less than 30% of the total roof surface. Individual shingle replacement proves cost-effective and maintains the existing roof system's integrity. This approach works best for roofs under 15 years old with otherwise sound underlying structures.
| Repair Indicators | Replacement Indicators |
|---|---|
| Localized damage under 30% | Widespread damage over 40% |
| Roof age under 15 years | Roof age over 20 years |
| Sound decking and underlayment | Sagging or soft decking |
| Recent storm damage | Chronic leak problems |
| Missing or damaged flashing | Multiple previous repairs failing |
Cost Considerations for Repair Decisions
Financial analysis often drives the repair versus replacement decision. Small repairs typically range from $150 to $400 for basic shingle replacement, while extensive damage repairs can reach $1,000 to $3,000. When repair costs exceed 25% of replacement cost, full replacement usually provides better long-term value.
Insurance coverage for roof repairs varies significantly based on damage cause and policy terms. Storm damage typically receives coverage, while maintenance-related issues generally do not. Understanding your policy specifics helps make informed repair decisions.
Essential Tools and Materials for Shingle Repair
Professional-quality repairs require proper equipment and materials. Cutting corners on tools or materials compromises repair longevity and potentially creates new problems.
Safety equipment remains paramount for any roofing work:
- OSHA-compliant fall protection harness and rope
- Non-slip roofing shoes with proper tread
- Safety glasses and work gloves
- Ladder stabilizers and standoffs
Specialized Roofing Tools
Beyond basic safety gear, specific tools ensure proper installation. A flat pry bar removes damaged shingles without disturbing surrounding materials. Roofing hammers with alignment guides drive nails to proper depth, while utility knives with hooked blades cut shingles cleanly.
Replacement shingles must match existing materials in color, style, and thickness. Architectural shingles cannot substitute for three-tab varieties without creating aesthetic and functional mismatches. Many homeowners discover that finding exact color matches for older roofs proves challenging as manufacturers discontinue product lines.
Additional required materials include:
- Roofing nails (1.25-inch minimum length)
- Roofing cement or sealant
- Galvanized flashing (if needed)
- Roof underlayment patches
- Caulk gun for precise sealant application
Step-by-Step Asphalt Shingle Roof Repair Process
The National Roofing Contractors Association provides detailed technical standards for shingle repair procedures. Following these industry-approved methods ensures repairs meet professional quality standards.
Preparing the Repair Area
Weather conditions significantly impact repair success. Schedule work during dry periods with temperatures between 45°F and 85°F. Extreme heat makes shingles brittle, while cold temperatures prevent proper adhesive activation.
Begin by carefully examining the damage extent. Sometimes visible damage indicates larger underlying problems. Water stains on interior ceilings or attic spaces suggest prolonged leaks requiring more extensive repair.
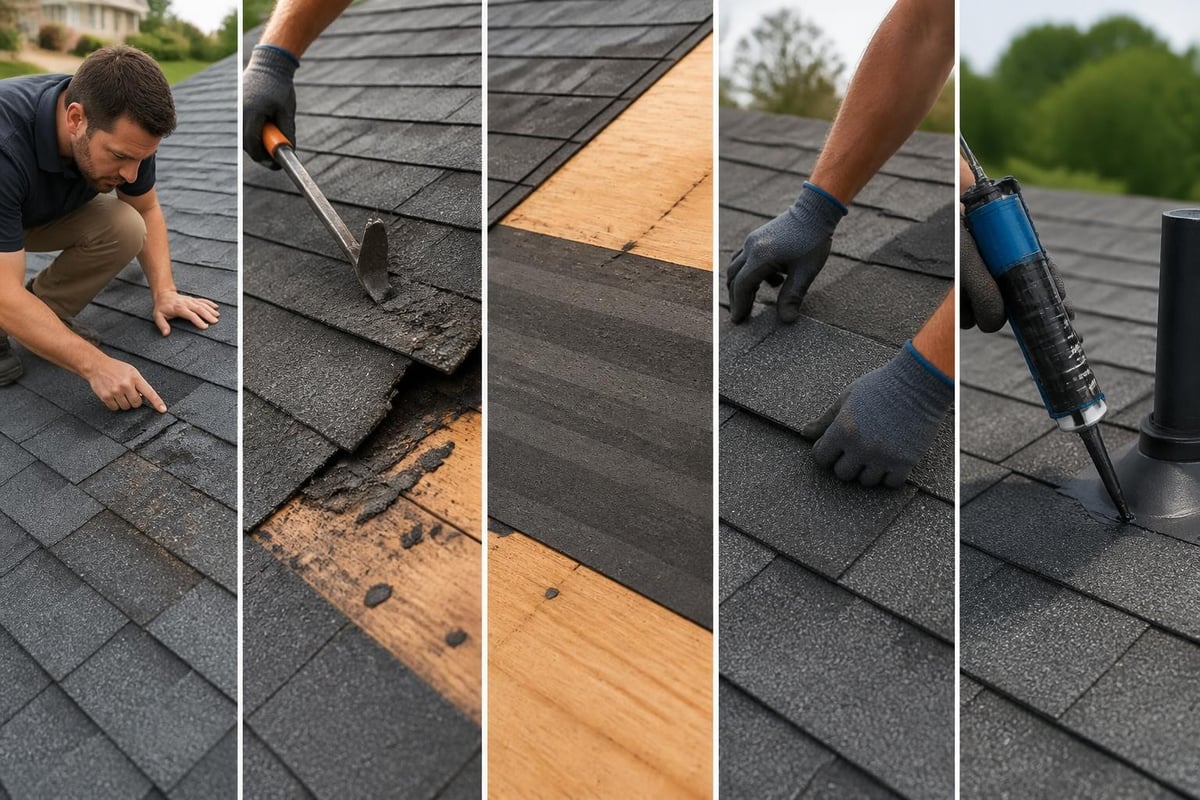
- Remove damaged shingles by lifting edges of overlapping shingles above the damaged area
- Extract roofing nails using the pry bar, working carefully to avoid tearing surrounding shingles
- Inspect underlying felt paper for damage, replacing sections as needed
- Check roof decking for soft spots, rot, or water damage requiring replacement
- Clean the repair area of all debris, old nails, and loose granules
Installing Replacement Shingles
Proper installation technique determines repair longevity. iFixit’s shingle replacement guide demonstrates the step-by-step process with visual clarity, helping homeowners understand professional techniques.
Slide new shingles into position, aligning them precisely with adjacent shingles. The shingle exposure (visible portion) must match existing patterns exactly. Misalignment creates vulnerable spots where water can penetrate.
Nail placement follows specific patterns depending on shingle type. Three-tab shingles require four nails positioned one inch from each end and centered above each tab cutout. Architectural shingles need six nails placed according to manufacturer specifications, typically marked on the shingle backing.
Critical installation steps:
- Apply roofing cement to the underside of lifted overlapping shingles
- Secure new shingles with appropriate nail quantity and placement
- Seal all nail heads with small dabs of roofing cement
- Press down overlapping shingles firmly to activate adhesive strips
- Apply additional roofing cement along all edges for wind resistance
Working with professional roofing contractors ensures repairs meet local building codes and manufacturer specifications, particularly important for maintaining warranty coverage.
Flashing Repair and Replacement
Flashing failures cause more leaks than shingle damage in many cases. These metal or rubberized barriers seal vulnerable roof penetrations and transitions where different surfaces meet.
Common Flashing Problem Areas
Valley flashing channels water from converging roof planes. Corrosion, cracks, or improper installation create leak pathways during heavy rain. Chimney flashing requires especially careful attention, as the masonry-to-shingle transition experiences significant thermal expansion differences.
| Flashing Type | Common Issues | Repair Approach |
|---|---|---|
| Valley flashing | Corrosion, holes | Complete replacement recommended |
| Chimney flashing | Separated counter-flashing | Re-seal and secure properly |
| Vent pipe boots | Cracked rubber seal | Replace entire boot assembly |
| Skylight flashing | Deteriorated sealant | Remove skylight, install new flashing |
| Drip edge | Missing or damaged sections | Install new sections with overlap |
Vent pipe boots combine metal bases with rubber collars that deteriorate from UV exposure and temperature cycles. When rubber cracks appear, complete boot replacement prevents leaks more reliably than attempting to patch the collar.
Professional asphalt shingle roof repair addresses both shingle and flashing problems comprehensively. Repairing shingles while ignoring deteriorated flashing simply delays inevitable leak problems.
Preventive Maintenance to Minimize Repairs
Strategic maintenance significantly reduces repair frequency and extends roof lifespan. Regular inspections identify small problems before they escalate into expensive damage.
Bi-annual roof inspections should occur in spring and fall, examining the entire roof surface systematically. Look for loose, damaged, or missing shingles, checking that all flashing remains secure and sealed. Clean gutters and downspouts to ensure proper drainage, as standing water accelerates shingle deterioration.
Addressing Moss and Algae Growth
Organic growth on shingles creates multiple problems. Moss roots penetrate between shingle layers, lifting edges and creating water entry points. Algae discoloration reduces curb appeal and may indicate moisture retention issues.
- Install zinc or copper strips along roof ridges to prevent growth
- Remove existing growth with specialized roof cleaning solutions
- Avoid pressure washing, which damages shingle granules
- Trim overhanging tree branches to increase sunlight exposure
- Improve attic ventilation to reduce moisture accumulation
Storm damage repair services become necessary when severe weather strikes, but proactive maintenance reduces vulnerability to wind and hail damage. Well-maintained shingles with proper adhesion resist wind uplift more effectively than aged, brittle materials.

Attic ventilation directly impacts shingle longevity. Inadequate ventilation causes heat and moisture buildup that ages shingles prematurely from the underside. Balanced intake and exhaust ventilation maintains proper attic temperatures, preventing ice dam formation in winter and excessive heat in summer.
DIY vs Professional Repair Considerations
Homeowners with construction experience and proper safety equipment can tackle simple asphalt shingle roof repair projects. Replacing a few missing shingles on a low-slope, single-story roof presents manageable challenges for capable DIY enthusiasts.
However, several situations demand professional expertise. Steep-slope roofs create significant fall hazards requiring specialized safety equipment and training. Multi-story homes compound safety risks while making material handling more difficult.
When Professional Help Becomes Essential
Complex repairs involving structural damage, multiple leak sources, or extensive shingle replacement exceed most homeowners' capabilities. Professional shingle roofing companies bring experience diagnosing hidden problems that DIY repairs often miss.
Professional advantages include:
- Comprehensive warranty coverage on labor and materials
- Proper safety equipment and insurance protection
- Experience identifying underlying structural issues
- Access to wholesale material pricing
- Knowledge of local building codes and permit requirements
- Ability to match discontinued shingle colors and styles
Insurance claim processing often requires professional documentation and estimates. Working with experienced contractors streamlines the claims process and ensures repairs meet insurance company standards for coverage approval.
Material Quality and Manufacturer Specifications
Not all replacement shingles provide equal performance. Budget-oriented shingles may save initial costs but typically lack the durability and wind resistance of premium products.
Manufacturer specifications detail proper installation procedures, nail patterns, and temperature requirements. Following these guidelines maintains warranty validity and ensures optimal performance. Many warranty claims face denial due to improper installation techniques, even when the shingles themselves show no manufacturing defects.
Understanding Shingle Ratings
Wind resistance ratings indicate how well shingles resist uplift forces. Class F shingles withstand winds up to 110 mph, while Class H products handle 150 mph gusts. Areas prone to severe weather justify investing in higher-rated products.
Impact resistance ratings matter in hail-prone regions. Class 4 (highest rating) shingles resist damage from 2-inch hailstones and often qualify for insurance premium discounts. Class 1 shingles offer minimal impact protection, suitable only for areas with rare hail events.
Fire ratings range from Class A (highest) to Class C. Most modern asphalt shingles achieve Class A ratings, important for wildfire-prone areas and often required by local building codes.
Seasonal Considerations for Roof Repairs
Timing asphalt shingle roof repair projects around weather patterns maximizes success rates and longevity. Each season presents distinct advantages and challenges.
Spring offers moderate temperatures ideal for shingle adhesive activation. However, spring storms may interrupt project schedules, and contractors often face busy seasons with longer wait times.
Summer provides consistent dry weather and extended daylight hours for completing work. Extreme heat requires early morning work schedules to avoid shingle damage from excessive temperatures. Hot shingles become fragile and tear easily during handling.
| Season | Advantages | Disadvantages | Best For |
|---|---|---|---|
| Spring | Moderate temps, adhesive activation | Unpredictable weather, busy contractors | Routine maintenance |
| Summer | Dry conditions, long days | Extreme heat, shingle brittleness | Emergency repairs |
| Fall | Ideal temperatures, lower demand | Shorter days, leaf debris | Planned projects |
| Winter | Immediate availability, lower prices | Cold prevents sealing, safety risks | Leak emergencies only |
Fall represents the optimal repair season in most climates. Temperatures remain moderate, contractor schedules open up after summer rush, and completing repairs before winter prevents cold-weather damage.
Winter repairs should address emergencies only. Cold temperatures prevent proper adhesive activation, requiring manual sealing of all shingle tabs. Ice and snow create hazardous working conditions that significantly increase accident risks.
Long-Term Roof Performance Optimization
Beyond immediate repairs, optimizing overall roof system performance prevents future problems and maximizes material lifespan. Integrated approaches addressing ventilation, insulation, and drainage create comprehensive protection.
Proper attic insulation reduces heat transfer that ages shingles prematurely. Energy Star recommendations suggest R-38 to R-60 insulation values for most climates, preventing heat buildup that deteriorates shingles from beneath.
Creating Effective Roof Ventilation
Balanced ventilation systems combine intake vents at soffits with exhaust vents at or near the ridge. This configuration creates natural airflow that removes heat and moisture continuously. Inadequate ventilation voids many shingle warranties and substantially reduces expected lifespan.
Calculate required ventilation using the 1:150 rule (one square foot of vent area per 150 square feet of attic space) as a minimum baseline. Increasing to 1:300 with balanced intake and exhaust provides optimal performance.
Ridge vents paired with continuous soffit vents create the most effective ventilation patterns. Avoid mixing different exhaust vent types (ridge vents with turbine vents, for example), as this disrupts airflow patterns and reduces overall effectiveness.
Professional contractors like those at local roofing companies assess ventilation adequacy during repair projects, identifying deficiencies that contribute to premature shingle failure. Addressing these systemic issues during repairs prevents recurring problems.
Documentation and Warranty Management
Maintaining thorough records of all asphalt shingle roof repair work protects your investment and facilitates future work. Photograph damage before and after repairs, save all receipts and invoices, and file warranty documentation securely.
Manufacturer warranties typically cover material defects for 20-50 years depending on product tier. However, these warranties often include prorated coverage periods where homeowner responsibility increases over time. Workmanship warranties from contractors usually last 1-10 years, covering installation defects separate from material failures.
Essential documentation includes:
- Original installation receipts and warranties
- Repair invoices with detailed work descriptions
- Before and after photographs
- Inspection reports from professionals
- Insurance claim documentation
- Permit records and final inspections
Transfer warranty documentation when selling property. Many shingle warranties include transferability provisions that add value for prospective buyers, but require proper notification to manufacturers within specified timeframes.
Properly executed asphalt shingle roof repair extends your roof's functional life while protecting your home from water damage and maintaining curb appeal. Understanding damage types, repair techniques, and when to seek professional help empowers homeowners to make informed decisions about their roofing investments. Whether you need minor shingle replacement or comprehensive storm damage restoration, Great Roofing brings family-owned dedication and professional expertise to every project throughout the Joliet area. Contact our experienced team today for a thorough roof assessment and customized repair solutions that protect your home for years to come.