


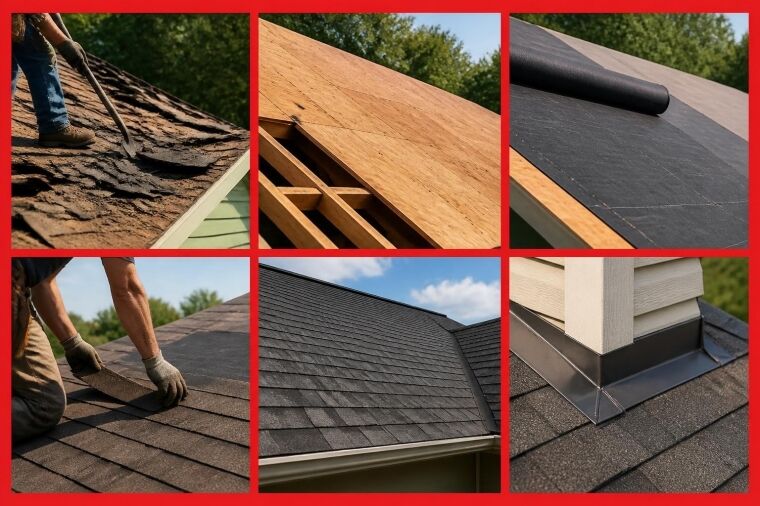
A properly executed residential roofing installation determines how well your home withstands decades of weather exposure, protects your family, and maintains structural integrity. The quality of installation matters just as much as the materials themselves, making it essential to understand what goes into a professional roof replacement. Whether you're planning to replace an aging roof or recovering from storm damage, knowing the installation process helps you make informed decisions and ensures contractors meet industry standards throughout every phase of the project.
Understanding Modern Roofing Systems
Today's residential roofing installation involves far more than simply nailing shingles to a roof deck. A complete system includes multiple layers working together to provide weather protection, ventilation, and energy efficiency.
The roof deck serves as the foundation, typically consisting of plywood or oriented strand board (OSB) sheathing. A quality installation begins with inspecting this substrate for damage, rot, or structural deficiencies that could compromise the new roof.
Above the deck, contractors install an underlayment layer that acts as a secondary water barrier. Modern synthetic underlayments have largely replaced traditional felt paper, offering superior tear resistance and UV protection during installation delays.
Critical Components of a Complete System
Every residential roofing installation must address several key elements:
- Ice and water shield along eaves, valleys, and penetrations
- Drip edge metal to protect fascia and direct water into gutters
- Starter shingles to ensure proper edge coverage and wind resistance
- Proper ventilation through ridge vents, soffit vents, or gable vents
- Flashing around chimneys, skylights, walls, and plumbing vents
The U.S. Department of Energy provides detailed guidance on installing roof ventilation systems that extend shingle life and reduce cooling costs. Proper attic ventilation prevents heat and moisture buildup that accelerates material degradation.

Material Selection for Long-Term Performance
Choosing the right materials represents one of the most important decisions in any residential roofing installation project. Asphalt shingles dominate the residential market, but performance varies significantly between products.
Asphalt Shingle Categories
| Shingle Type | Expected Lifespan | Wind Rating | Price Point |
|---|---|---|---|
| 3-tab | 15-20 years | 60 mph | $ |
| Architectural | 25-30 years | 110-130 mph | $$ |
| Premium/Designer | 30-50 years | 130+ mph | $$$ |
| Impact-resistant | 30-40 years | 110-130 mph | $$$ |
Consumer Reports regularly tests and rates asphalt shingles, evaluating their resistance to wind, impact, and weathering. Their independent laboratory results help homeowners compare warranty claims against real-world performance.
Architectural shingles have become the standard for most residential roofing installation projects in 2026. These laminated products offer dimensional appearance, enhanced durability, and better wind resistance than basic 3-tab shingles. For regions with frequent hail, impact-resistant shingles carry a UL 2218 Class 4 rating and often qualify for insurance discounts.
Beyond shingles, homeowners should consider fire ratings when selecting materials. The UL classification system rates roof coverings as Class A, B, or C based on fire-test performance. Class A provides the highest level of fire resistance, which many building codes require in wildfire-prone areas.
Great Roofing helps Joliet-area homeowners navigate these options by providing detailed information on the best asphalt roof shingles available for local climate conditions.
Preparing for Installation Day
Successful residential roofing installation begins well before the crew arrives. Proper preparation protects your property and ensures the project proceeds smoothly.
Homeowners should clear vehicles from driveways and garages to provide equipment access. Crews need space for material delivery, dumpsters, and truck-mounted equipment. Inside the home, remove wall hangings and fragile items from upper floors, as vibration from tear-off can cause items to fall.
Protecting landscaping requires attention as well:
- Move potted plants and outdoor furniture away from the house perimeter
- Cover sensitive shrubs and garden beds with tarps
- Mark sprinkler heads and underground utilities
- Trim tree branches within six feet of the roof
Inform neighbors about the project timeline. Roofing work generates noise and activity that affects adjacent properties. Professional contractors place warning signs and maintain clean work areas throughout the installation.
Weather Considerations
Weather significantly impacts installation quality and timing. Most residential roofing installation should occur when temperatures range between 45°F and 85°F. Shingle adhesive strips require warmth to seal properly, while extreme heat makes materials too pliable.
Rain delays installation completely, as wet decking prevents proper adhesion and creates safety hazards. Contractors monitor forecasts closely and may reschedule tear-off if precipitation threatens.
Wind presents another challenge. Crews typically avoid working in sustained winds above 25 mph, which can lift materials and create dangerous conditions. The FORTIFIED Home program emphasizes installation practices that enhance wind resistance through proper fastening patterns and sealed deck systems.
The Installation Process Step by Step
Professional residential roofing installation follows a systematic sequence designed to ensure quality at every stage. Understanding this process helps homeowners recognize proper workmanship.
Tear-Off and Deck Inspection
Crews begin by removing existing shingles, underlayment, and flashing down to the bare deck. This complete tear-off reveals hidden damage that inspection from above cannot detect. Workers examine every inch of decking for soft spots, rot, or structural deficiencies.
Any compromised sheathing requires replacement before installation continues. Contractors cut out damaged sections and install new plywood or OSB, securing it with properly spaced nails or screws. This attention to the substrate prevents future problems that would otherwise remain hidden beneath new materials.
Underlayment and Protection Layers
With a sound deck confirmed, installation of protective layers begins. Crews apply ice and water shield along all eaves, extending it at least 24 inches past the interior wall line in cold climates. This self-adhering membrane prevents ice dam damage during winter months.
Valley areas receive ice and water shield running the full length, with width depending on valley pitch. Lower-slope valleys require wider protection. Some contractors install this membrane across the entire deck for maximum protection, though cost considerations typically limit full-deck coverage to premium installations.
Drip edge installation occurs next:
- Metal drip edge attaches along eaves before underlayment
- Synthetic underlayment rolls out in horizontal courses with proper overlap
- Gable drip edge installs over underlayment along rake edges
- All seams receive fasteners at specified intervals
The NRCA Roofing Manual provides detailed specifications for underlayment overlap, fastener patterns, and material handling that professional installers follow to maintain warranty compliance.
Shingle Installation and Detailing
Starter strips along eaves and rakes provide a sealed edge that prevents wind-driven rain from infiltrating under the first course. Proper starter installation has become increasingly important as wind events intensify.
Field shingles install in offset courses, with each tab covering the fasteners of the course below. Fastener placement follows manufacturer specifications exactly-typically four to six nails per shingle positioned in the designated nail zone. Over-driving or under-driving fasteners compromises wind resistance and longevity.
| Installation Detail | Purpose | Common Mistake |
|---|---|---|
| Nail placement | Secures shingle without over-penetration | Nailing too high or too low in shingle |
| Shingle alignment | Maintains straight courses and water flow | Allowing progressive misalignment |
| Valley method | Protects vulnerable area from leaks | Inadequate underlayment or cutting errors |
| Hip and ridge caps | Seals peak areas against wind/rain | Insufficient nailing or improper overlap |
Professional crews maintain straight sight lines using chalk lines and verify alignment regularly. Valleys receive either woven, closed-cut, or open-metal treatment depending on roof design and preference. Each method has specific installation requirements that affect long-term performance.
Flashing and Penetration Details
The most critical aspects of residential roofing installation involve properly flashing areas where the roof plane meets vertical surfaces or penetrations. These vulnerable points account for the majority of leak complaints when not executed correctly.
Chimney Flashing
Chimney flashing requires a two-part system: step flashing integrated with shingle courses and counter flashing embedded into mortar joints. The step flashing pieces install with each shingle course along the chimney sides, while counter flashing covers the step flashing and diverts water outward.
Modern contractors often use pre-formed chimney cricket systems for the high side of chimneys wider than 30 inches. These diverters prevent debris accumulation and ice dam formation.
Plumbing Vent and Skylight Flashing
Plumbing vents require boot-style flashing that seals around the pipe and integrates with surrounding shingles. Quality boots feature EPDM rubber or lead that conforms to pipe diameter while resisting UV degradation. Shingles above the vent install over the boot, while those beside and below it install under the flashing.
Skylight installation demands precision and proper product selection. Curb-mounted skylights need custom step flashing on all four sides, while deck-mounted units rely on integrated flashing kits. Either way, ice and water shield beneath the flashing provides secondary protection.
Great Roofing's installation teams bring extensive experience in these critical details, ensuring every penetration receives proper attention during residential and commercial projects throughout the Joliet area.
Ventilation Integration
Adequate attic ventilation represents an essential but often overlooked component of residential roofing installation. Proper airflow extends shingle life, reduces cooling costs, and prevents moisture problems that damage framing and insulation.
The balanced ventilation system requires intake vents at soffits and exhaust vents near the ridge. A general rule calls for one square foot of net free ventilation area per 150 square feet of attic space, split evenly between intake and exhaust.
Common ventilation solutions include:
- Continuous ridge vents paired with soffit vents
- Box vents or turtle vents for exhaust
- Gable vents for cross-ventilation
- Power attic ventilators for enhanced airflow
Ridge vents have become the preferred exhaust method in most residential roofing installation projects. These low-profile products install along the entire ridge length, providing consistent exhaust without the spotty coverage of individual box vents. External baffles prevent rain and snow infiltration while allowing air to escape.
Installation requires cutting a slot along both sides of the ridge board, typically one to two inches wide. The vent product covers this opening while maintaining weather protection. Proper installation ensures the vent extends to within one inch of the ridge ends without leaving gaps.
Quality Assurance and Final Inspection
Professional contractors implement quality control measures throughout residential roofing installation to catch issues before they become problems. Multiple team members verify work at each stage, ensuring compliance with manufacturer specifications and building codes.
Multi-Point Inspection Checklist
- Deck integrity confirmed before covering
- Underlayment properly lapped and fastened
- Flashing correctly installed and sealed
- Fastener patterns meeting wind-rating requirements
- Ventilation providing adequate intake and exhaust
- Ridge caps aligned and fully adhered
- Valleys properly protected and sealed
- Debris removal completed thoroughly
Magnetic sweepers collect nails and metal debris from the property perimeter. Crews also check gutters for accumulated debris that could cause drainage problems. A final walk-around inspection with the homeowner addresses any questions and ensures satisfaction.
Investment Protection Through Proper Documentation
Completing a residential roofing installation generates important documentation that protects your investment. Professional contractors provide detailed records including material specifications, warranty information, and installation certificates.
Essential documentation includes:
- Material delivery receipts showing product grades and quantities
- Manufacturer warranty certificates activated with installation date
- Contractor labor warranty terms and coverage period
- Building permit and final inspection approval
- Before and after photographs of all work areas
Store these documents with other home improvement records. Warranty claims require proof of proper installation using specified materials. Some manufacturers void coverage if homeowners cannot demonstrate compliance with installation requirements.
Maintenance recommendations should accompany final documentation. Regular inspections identify minor issues before they escalate into costly repairs. Most contractors suggest annual inspections, with additional checks following severe weather events.
Great Roofing provides comprehensive documentation packages and maintains detailed project records to support warranty claims and future service needs. Homeowners can view completed projects in the project gallery showcasing installation quality and attention to detail.
Working with Professional Contractors
Selecting the right contractor makes the difference between a residential roofing installation that performs as expected and one that generates ongoing problems. Several factors distinguish qualified professionals from those who cut corners.
Verify proper licensing and insurance coverage before signing any contract. Contractors should carry general liability insurance and workers compensation coverage protecting homeowners from liability. Request certificates of insurance and confirm coverage with the insurance provider directly.
Contractor Selection Criteria
| Factor | What to Verify | Red Flags |
|---|---|---|
| Experience | Years in business, local projects | Recently formed, no local references |
| Credentials | Manufacturer certifications, memberships | No certifications or training documentation |
| Insurance | Current GL and workers comp | Reluctance to provide certificates |
| References | Recent customers, contact information | Only old references or none provided |
| Contract | Detailed scope, timeline, payment terms | Vague terms, large deposits, verbal agreements |
Manufacturer certifications demonstrate that installation crews have received proper training in product application. Companies like GAF, Owens Corning, and CertainTeed offer tiered certification programs recognizing contractors who meet quality and service standards.
Request references from recent projects similar in scope to yours. Contact these homeowners to discuss their experience, focusing on communication, timeline adherence, and how the contractor handled unexpected issues.
Written contracts should specify materials by brand and grade, installation methods, project timeline, payment schedule, and cleanup procedures. Avoid contractors requesting full payment upfront or offering prices significantly below other estimates-these often indicate problems.
Cost Factors and Budget Planning
Residential roofing installation costs vary based on numerous factors including roof size, pitch, complexity, material selection, and regional labor rates. Understanding cost components helps homeowners budget appropriately and evaluate contractor proposals.
Primary cost drivers include:
- Square footage of roof area
- Roof pitch and complexity (multiple valleys, dormers, angles)
- Number and type of penetrations requiring flashing
- Accessibility and building height
- Material grade and warranty level
- Disposal fees for existing materials
- Deck repair or replacement needs
The average residential roofing installation in the Midwest ranges from eight thousand to sixteen thousand dollars for a typical 2,000-square-foot home. Premium materials, complex architecture, or extensive repairs increase costs accordingly.
Financing options have expanded in recent years, with many contractors offering payment plans or partnering with specialized lenders. Some homeowners use home equity lines of credit to fund roofing projects, taking advantage of tax-deductible interest.
Insurance coverage may offset costs when storm damage necessitates replacement. Document damage thoroughly with photographs before repairs, and consider hiring a public adjuster if the insurance company disputes the claim. Contractors experienced in insurance work can provide detailed damage assessments supporting your claim.
Seasonal Considerations and Timing
The timing of residential roofing installation affects both cost and quality. Understanding seasonal factors helps homeowners plan projects for optimal results.
Spring and fall represent peak roofing seasons, with mild temperatures facilitating proper material application. However, high demand during these periods can extend lead times and reduce contractor availability. Scheduling installations during shoulder seasons often provides faster service.
Summer installations proceed quickly due to long daylight hours and predictable weather, but extreme heat challenges workers and affects material handling. Shingles become pliable in high temperatures, requiring careful handling to prevent damage. Early morning starts allow crews to complete work before peak heat.
Winter installations remain possible in moderate climates when temperatures stay above 45°F. Cold weather slows adhesive activation, requiring special high-temperature sealants or manual sealing of shingle tabs. Snow and ice prevent work entirely, potentially delaying projects.
Planning ahead by six to eight weeks provides the best chance of securing preferred contractors and timing. Emergency replacements following storm damage may not allow such luxury, making it important to identify qualified contractors before urgent needs arise.
Residents throughout Joliet and surrounding communities can contact Great Roofing for professional consultations and detailed project proposals tailored to specific roofing needs and timing requirements.
Quality residential roofing installation requires careful material selection, precise execution of proven techniques, and attention to countless details that determine long-term performance. Understanding the process empowers homeowners to make informed decisions and recognize quality workmanship. Great Roofing brings three generations of roofing expertise to every project, combining traditional craftsmanship with modern materials and methods to deliver installations that protect Joliet-area homes for decades. Whether you need a complete roof replacement or want to discuss options for your home, Great Roofing provides the knowledge and skill your project deserves.