


Understanding the proper techniques for roof shingles installation is essential for homeowners in Joliet and the surrounding Illinois area who want to ensure their roofing investment delivers maximum protection and longevity. Whether you're considering a DIY project or planning to work with professionals, knowing the fundamentals of shingle installation helps you make informed decisions and recognize quality workmanship. The process involves precise preparation, attention to manufacturer specifications, and adherence to building codes that protect your home from the harsh Midwest weather patterns we experience throughout the year.
Essential Preparation Before Starting Installation
Successful roof shingles installation begins long before the first shingle touches your roof deck. Proper preparation separates amateur work from professional results that last decades.
Assessing Your Current Roof Condition
Before beginning any installation work, conduct a thorough inspection of your existing roof structure. Check for signs of water damage, rotted decking, or compromised structural elements that need addressing first. The roof deck must be solid, dry, and properly ventilated to support new shingles effectively.
Key preparation steps include:
- Removing all old roofing materials down to the deck
- Replacing damaged or rotted plywood sheathing
- Ensuring proper roof ventilation systems are in place
- Checking for proper flashing around chimneys and vents
- Verifying that the roof slope meets minimum requirements
Weather conditions play a critical role in installation timing. Temperature affects shingle adhesive activation, so plan your project when temperatures will remain above 40°F for several consecutive days. This ensures proper seal formation between shingle layers.
Gathering Materials and Tools
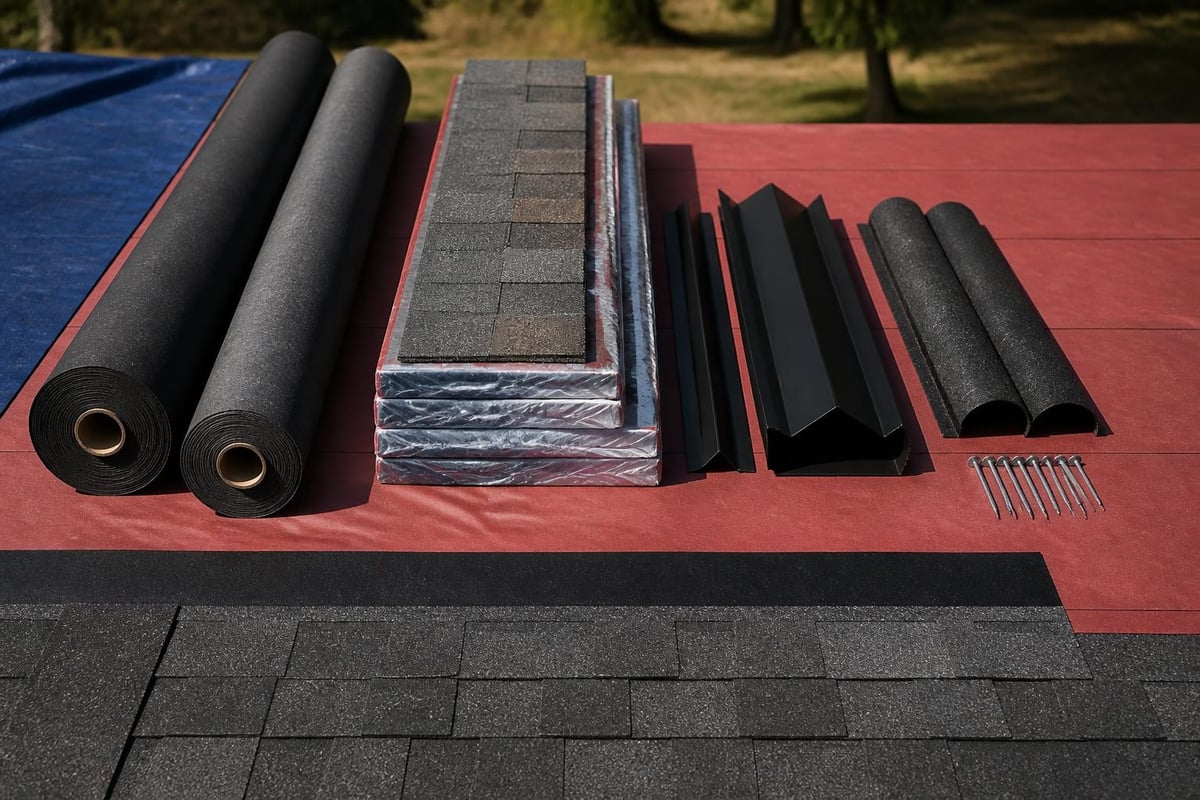
Having the right equipment on hand streamlines the installation process and prevents mid-project delays. According to comprehensive installation guides from manufacturers like Owens Corning, using approved materials ensures warranty compliance and optimal performance.
| Essential Materials | Required Tools | Safety Equipment |
|---|---|---|
| Asphalt shingles | Roofing nailer | Safety harness |
| Underlayment | Utility knife | Non-slip boots |
| Drip edge | Chalk line | Hard hat |
| Ice and water shield | Measuring tape | Safety glasses |
| Roofing nails | Pry bar | Roof brackets |
| Ridge cap shingles | Shingle cutter | Fall protection |
Understanding asphalt shingle pricing helps you budget appropriately for quality materials that meet your home's specific needs.
Installing Underlayment and Ice Barriers
The underlayment serves as a critical secondary water barrier that protects your roof deck if shingles fail or during severe weather events. This layer requires careful attention during roof shingles installation.
Applying Ice and Water Shield
Start at the eaves by installing ice and water shield, a self-adhering membrane that prevents ice dam damage. In Illinois, where freeze-thaw cycles are common, this protection is non-negotiable. Apply the membrane at least 24 inches beyond the interior wall line, covering the entire eave area.
For valleys and other vulnerable areas, extend ice and water shield at least 36 inches from the centerline in both directions. This prevents water infiltration where two roof planes meet and water flow concentrates.
Installing Felt or Synthetic Underlayment
After ice barriers are secured, install underlayment across the entire roof surface. Begin at the eaves and work upward, overlapping each row by at least six inches. Horizontal laps should overlap 4 inches minimum, while end laps require 6 inches of overlap.
Synthetic underlayment offers superior durability compared to traditional felt paper, especially if your project extends over multiple days. It resists tearing, provides better traction, and withstands UV exposure longer without degrading. Professional roofing contractors typically prefer synthetic options for their reliability and ease of installation.
Installing Starter Strips and First Course
The foundation of quality roof shingles installation lies in properly installed starter strips. These specialized shingles or modified standard shingles create the base for your entire roofing system.
Positioning Starter Shingles
Install starter strips along the eaves with the adhesive strip positioned to bond with the first course of field shingles. Overhang the drip edge by approximately one-half to three-quarters of an inch to direct water into gutters effectively.
Starter strip specifications:
- Extend starter shingles along the entire eave length
- Position adhesive strips upward, away from the roof edge
- Nail starter strips 3-4 inches from the eave edge
- Ensure straight alignment using chalk lines
- Verify proper overhang before securing
For rake edges, install starter strips vertically to provide wind resistance along gable ends. This prevents wind-driven rain from working underneath shingle edges during storms.
Establishing Proper Alignment
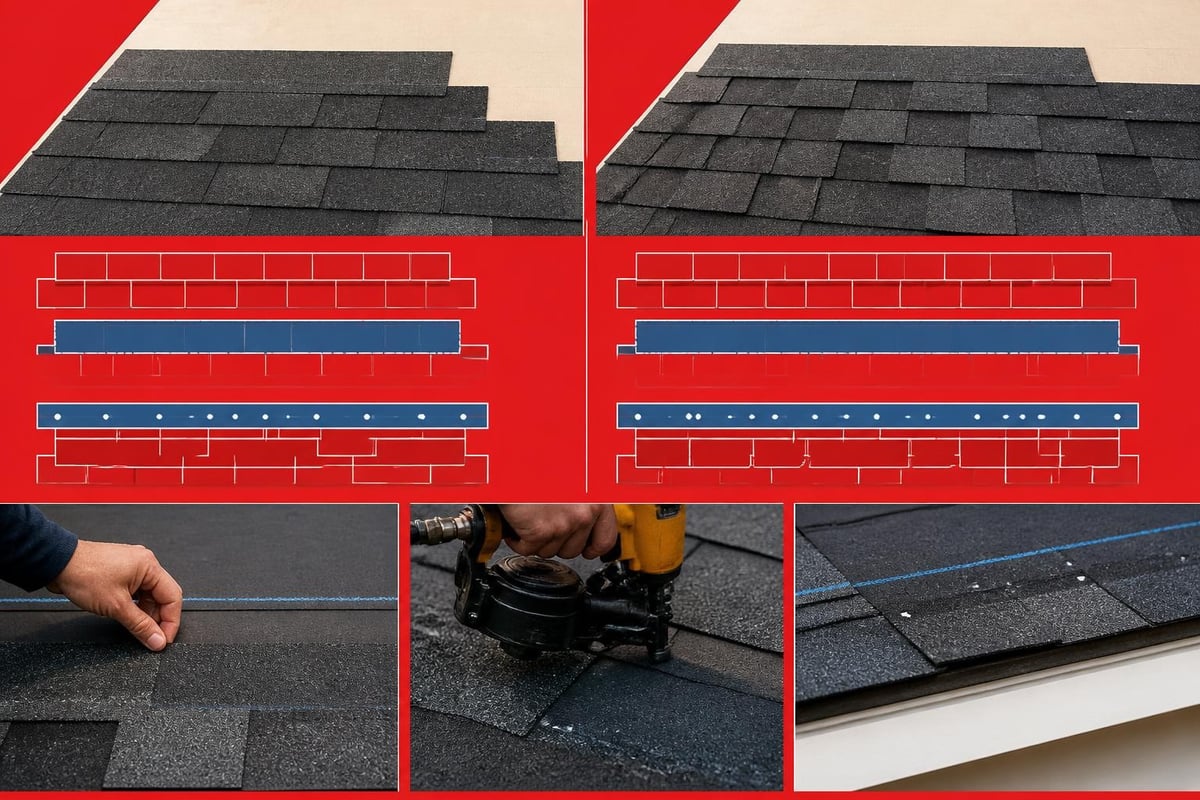
Accuracy in the first course determines the appearance and performance of your entire roof. Snap chalk lines to ensure straight rows, checking alignment every few courses to prevent cumulative drift. Step-by-step installation techniques from IKO emphasize the importance of maintaining consistent reveal and proper offset patterns.
The standard three-tab shingle installation uses a six-inch offset pattern, where each course shifts one-half tab width from the course below. Architectural shingles often employ different offset patterns, so always consult manufacturer specifications.
Field Shingle Installation Techniques
Installing field shingles requires consistent technique and attention to detail throughout the entire roof surface. Proper nailing, alignment, and overlap ensure your roof performs as designed.
Correct Nailing Patterns
Nail placement directly impacts shingle performance and wind resistance. Each shingle requires a minimum of four nails, positioned according to manufacturer specifications. For standard three-tab shingles, place nails approximately one inch from each end and just above the cutouts between tabs.
High-wind areas require six nails per shingle, positioned to secure both the installed shingle and the overlapping course above it. The nailing zone typically spans from just below the adhesive strip to about one inch above it. According to detailed guidance from This Old House, proper nail depth ensures shingle tabs seal correctly without overdriving, which can compromise the shingle's integrity.
Managing Offset and Overlap
Maintain consistent offset patterns throughout your installation. For three-tab shingles, the standard pattern repeats every seventh course, creating a diagonal appearance across the roof. Architectural shingles require attention to the manufacturer's specific offset requirements, which vary by product line.
Critical installation metrics:
- Exposure: Typically 5 inches for standard shingles
- Offset: One-half tab width for three-tab shingles
- Headlap: Minimum 2 inches between courses
- Sidelap: Minimum 3 inches at end joints
- Nail depth: Flush with shingle surface, not overdriven
Working from bottom to top and left to right creates the most efficient workflow. Some installers prefer the pyramid method, working up from the center, while others use the straight-up approach for steeper roofs.
Special Areas and Flashing Integration
Critical transition areas require specialized techniques during roof shingles installation to prevent water infiltration. These vulnerable points demand extra attention and proper flashing integration.
Valley Installation Methods
Two primary valley installation approaches dominate professional roofing: open valleys and woven valleys. Open valleys use metal flashing centered in the valley, with shingles cut to create a channel for water flow. This method provides superior water management and works well with residential maintenance programs focused on long-term performance.
Woven valleys interlock shingles from both roof planes, creating a continuous surface without exposed flashing. While visually seamless, this method requires precise installation to prevent future leaks.
Ridge and Hip Cap Installation
Completing ridge and hip areas requires specialized cap shingles or field shingles cut to size. Install cap shingles over a ridge vent if your attic ventilation system includes continuous ridge ventilation. Starting from the end opposite prevailing winds, overlap each cap shingle to prevent wind-driven rain infiltration.
Secure cap shingles with two nails per shingle, positioned one inch from each edge and five and one-half inches from the exposed end. This placement ensures the next cap shingle conceals nail heads while providing adequate holding power.
| Flashing Type | Application Area | Installation Priority |
|---|---|---|
| Step flashing | Wall intersections | High |
| Chimney flashing | Chimney perimeter | Critical |
| Pipe boots | Plumbing vents | High |
| Drip edge | Eaves and rakes | Essential |
| Valley flashing | Valley channels | Critical |
Safety Protocols and Best Practices
Professional roof shingles installation prioritizes worker safety throughout every phase of the project. Understanding and implementing proper safety measures protects both installers and property.
Fall Protection Systems
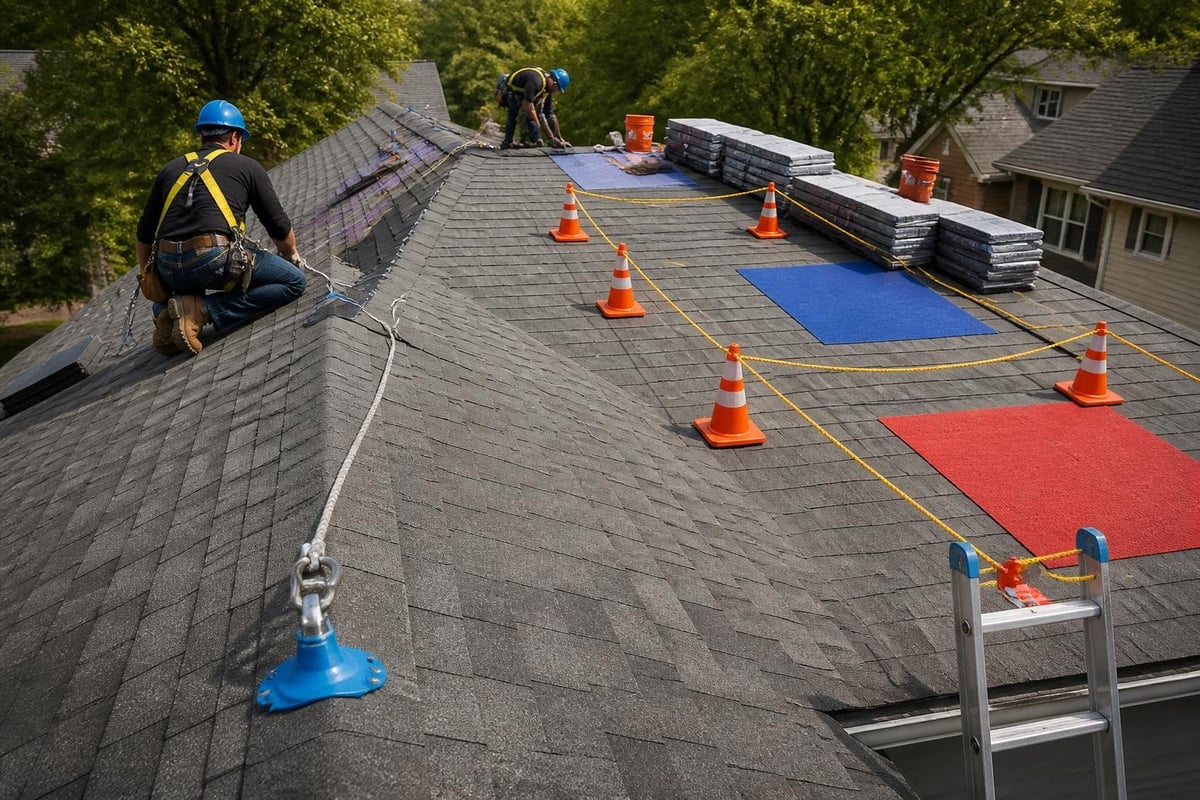
Falls represent the leading cause of roofing injuries. Implement comprehensive fall protection using personal fall arrest systems, guardrails, or safety net systems. Roof brackets provide stable working platforms on steep slopes, while harnesses with properly anchored lifelines prevent falls on all roof pitches.
OSHA requires fall protection when working at heights exceeding six feet. However, professional installers implement safety measures regardless of height, recognizing that even short falls can cause serious injuries.
Weather Considerations and Work Conditions
Never install shingles during rain, snow, or when frost covers the roof surface. Moisture prevents proper adhesive activation and creates dangerous working conditions. Similarly, extreme heat can make shingles too pliable, leading to damage during installation.
Ideal installation conditions include:
- Temperatures between 40°F and 85°F
- Dry roof surface and materials
- Low to moderate wind speeds (under 25 mph)
- Clear weather forecast for 24-48 hours
- Good visibility and adequate daylight
Understanding storm damage patterns helps homeowners recognize when professional installation becomes necessary after severe weather events.
Quality Control and Final Inspection
Completing roof shingles installation requires thorough inspection to verify all components meet professional standards. This final review identifies potential issues before they become costly problems.
Checking Seal Activation
Shingle adhesive strips require several days of warm weather to fully activate. After installation, inspect shingles to verify tabs are sealing to the underlying course. In cooler weather, manual sealing using roofing cement may be necessary for exposed shingles prone to wind uplift.
Walk the entire roof surface, checking for:
- Proper nail placement and depth across all courses
- Adequate shingle adhesion, especially on rake edges
- Correct alignment and consistent exposure
- Proper flashing integration at all transition points
- Complete coverage with no exposed underlayment
Cleanup and Site Restoration
Professional installation includes thorough cleanup of debris, including nail removal from gutters, lawns, and driveways. Magnetic sweepers collect metal fasteners that could puncture tires or injure feet. Quality roofing contractors understand that project completion includes leaving the property in pristine condition.
Inspect gutters to ensure proper drainage and remove any debris that accumulated during installation. Verify downspouts discharge properly and direct water away from the foundation.
Understanding Manufacturer Warranties and Requirements
Proper roof shingles installation directly impacts warranty coverage. Manufacturers specify precise installation requirements that must be followed to maintain warranty validity.
Documentation and Compliance
Modern shingle warranties distinguish between material defects and installation failures. Comprehensive warranties covering both require certified installers and strict adherence to installation instructions. Following manufacturer guidelines protects your investment and ensures maximum coverage duration.
Maintain detailed records of your installation, including:
- Material purchase receipts and product specifications
- Installation dates and weather conditions
- Photographs documenting critical installation phases
- Warranty registration confirmation
- Installer certifications and licensing information
Common Warranty Exclusions
Understanding what warranties don't cover helps set realistic expectations. Most manufacturer warranties exclude damage from improper installation, inadequate ventilation, or structural movement. Similarly, normal weathering and granule loss fall outside coverage parameters.
Enhanced warranties often require complementary roofing system components, including matching underlayment, hip and ridge caps, and ventilation products from the same manufacturer. Using complete systems from a single manufacturer simplifies warranty claims and often extends coverage periods.
Advanced Installation Considerations
Complex roof configurations require specialized knowledge beyond basic roof shingles installation techniques. Understanding these advanced scenarios helps property owners recognize when professional expertise becomes essential.
Working with Steep Slopes
Roofs with pitches exceeding 6:12 require modified installation approaches and enhanced safety measures. Steeper slopes increase material slide risk and demand more aggressive nailing patterns to resist gravity's downward pull. Some manufacturers specify additional fasteners or modified application techniques for steep-slope installations.
Roof brackets become essential on steep pitches, providing stable working platforms and fall protection anchor points. The increased difficulty and safety requirements of steep-slope work typically justify professional installation costs.
Architectural Shingle Patterns
Architectural or dimensional shingles offer enhanced aesthetic appeal but require attention to pattern alignment. These multi-layered shingles create depth and shadow lines that mimic traditional materials like slate or cedar shakes. Selecting the best asphalt roof shingles involves balancing appearance preferences with performance requirements and budget constraints.
Random tab designs minimize pattern repetition, but installers must still maintain consistent offset and avoid creating unintended visual patterns. Color blending from multiple bundles prevents noticeable shade variations across the roof surface.
Avoiding Common Installation Mistakes
Even experienced DIY enthusiasts encounter challenges during roof shingles installation. Recognizing common errors helps prevent costly repairs and premature roof failure.
Improper Nail Placement Issues
Overdriving nails tears shingle material and reduces holding power. Underdriven nails fail to secure shingles adequately and can work loose over time. Nails placed too high miss the underlying shingle course, eliminating the dual-fastening benefit that provides wind resistance.
Frequent nailing errors include:
- Missing the nailing zone entirely
- Angling nails instead of driving them straight
- Using incorrect nail length for shingle thickness
- Inconsistent nail spacing across courses
- Placing nails too close to shingle edges
Alignment and Offset Problems
Misaligned shingles create visual defects and potential leak paths. Cumulative alignment drift becomes increasingly apparent as installation progresses, often requiring extensive rework. Using chalk lines every few courses prevents drift and maintains professional appearance.
Incorrect offset patterns can create vertical joints through multiple courses, creating channels for water infiltration. Professional roofing techniques demonstrated visually help installers understand proper overlap requirements and offset sequences.
Working with Professional Contractors
While DIY roof shingles installation appeals to capable homeowners, complex projects often benefit from professional expertise. Understanding what professionals offer helps you make informed decisions.
Benefits of Professional Installation
Licensed contractors bring experience managing challenging roof configurations, proper insurance coverage, and access to professional-grade materials often unavailable to homeowners. They complete installations faster, typically finishing residential roofs in one to three days compared to weeks for DIY projects.
Professional installers understand local building codes and permit requirements, handling paperwork and inspections that homeowners might overlook. Their work often includes enhanced warranties covering both materials and labor.
Evaluating Contractor Credentials
Verify contractor licensing, insurance coverage, and manufacturer certifications before signing contracts. Request references from recent projects and check online reviews for patterns of positive or negative feedback. Legitimate contractors provide detailed written estimates itemizing materials, labor, and project timelines.
Ask potential contractors about their experience with your specific roofing material and roof configuration. Specialized expertise in asphalt shingle roofing ensures installers understand product-specific requirements and best practices.
Material Selection Impact on Installation
Different shingle types require modified installation approaches. Understanding how material characteristics affect installation helps you select products matching your skill level and project requirements.
Three-Tab Versus Architectural Shingles
Traditional three-tab shingles offer straightforward installation with clearly defined offset patterns. Their uniform thickness and simple design make them ideal for DIY projects. However, architectural shingles provide superior wind resistance and longer warranties, justifying their higher cost for many homeowners.
Architectural shingles weigh more than three-tab options, requiring attention to roof structure capacity and making handling more physically demanding. Their irregular profiles demand careful alignment to maintain visual appeal across large roof surfaces.
| Shingle Type | Weight per Square | Typical Warranty | Installation Complexity |
|---|---|---|---|
| Three-tab | 200-250 lbs | 20-25 years | Low to moderate |
| Architectural | 250-400 lbs | 25-50 years | Moderate |
| Premium designer | 350-450 lbs | Lifetime limited | Moderate to high |
| Impact resistant | 280-420 lbs | 30-50 years | Moderate |
Specialty Shingle Applications
Impact-resistant shingles incorporate modified asphalt formulations or reinforced construction to withstand hail damage. Areas prone to severe weather benefit from these enhanced products, though installation follows similar techniques to standard architectural shingles.
Cool roof shingles with reflective granules reduce heat absorption, lowering cooling costs in hot climates. While installation mirrors standard procedures, these products require attention to maintaining granule coverage during handling and cutting.
Post-Installation Maintenance
Proper maintenance extends the lifespan of your roof shingles installation, protecting your investment and preventing premature deterioration.
Regular Inspection Schedule
Conduct visual roof inspections twice annually, preferably in spring and fall. Look for damaged, missing, or curling shingles that require replacement. Check flashing integrity around chimneys, vents, and wall intersections where leaks commonly develop.
After severe weather events, inspect for storm damage including lifted shingles, granule loss, or impact damage from hail. Document any damage with photographs to support insurance claims if necessary.
Preventive Maintenance Tasks
Keep gutters clean and flowing freely to prevent water backup under shingle edges. Trim overhanging tree branches that drop debris onto the roof or provide squirrel access to potential entry points. Remove moss or algae growth promptly using approved cleaning solutions that won't damage shingles.
Address minor repairs immediately before they escalate into major problems. A single missing shingle can expose underlayment and decking to water damage, eventually requiring extensive repairs that could have been prevented with timely intervention.
Mastering roof shingles installation requires understanding proper preparation, precise technique, and attention to detail throughout every project phase. Whether you tackle installation yourself or hire professionals, this knowledge helps ensure quality results that protect your home for decades. When you're ready to begin your roofing project in Joliet or surrounding areas, Great Roofing brings three generations of family expertise to deliver exceptional results backed by comprehensive warranties and personalized service that only a locally-owned contractor can provide.