

Proper shingle installation remains one of the most critical factors determining the longevity and performance of residential roofing systems. Whether you're planning a complete roof replacement or addressing storm damage repairs, understanding the fundamentals of quality installation can help you make informed decisions about your property. From selecting appropriate materials to implementing proven techniques, every aspect of the installation process contributes to your roof's ability to protect your home for decades to come.
Understanding the Fundamentals of Shingle Installation
The foundation of any successful roofing project begins with comprehensive preparation and quality materials. Before any shingles reach your roof deck, contractors must ensure the underlying structure is sound, properly ventilated, and ready to support the new roofing system.
Roof Deck Preparation and Assessment
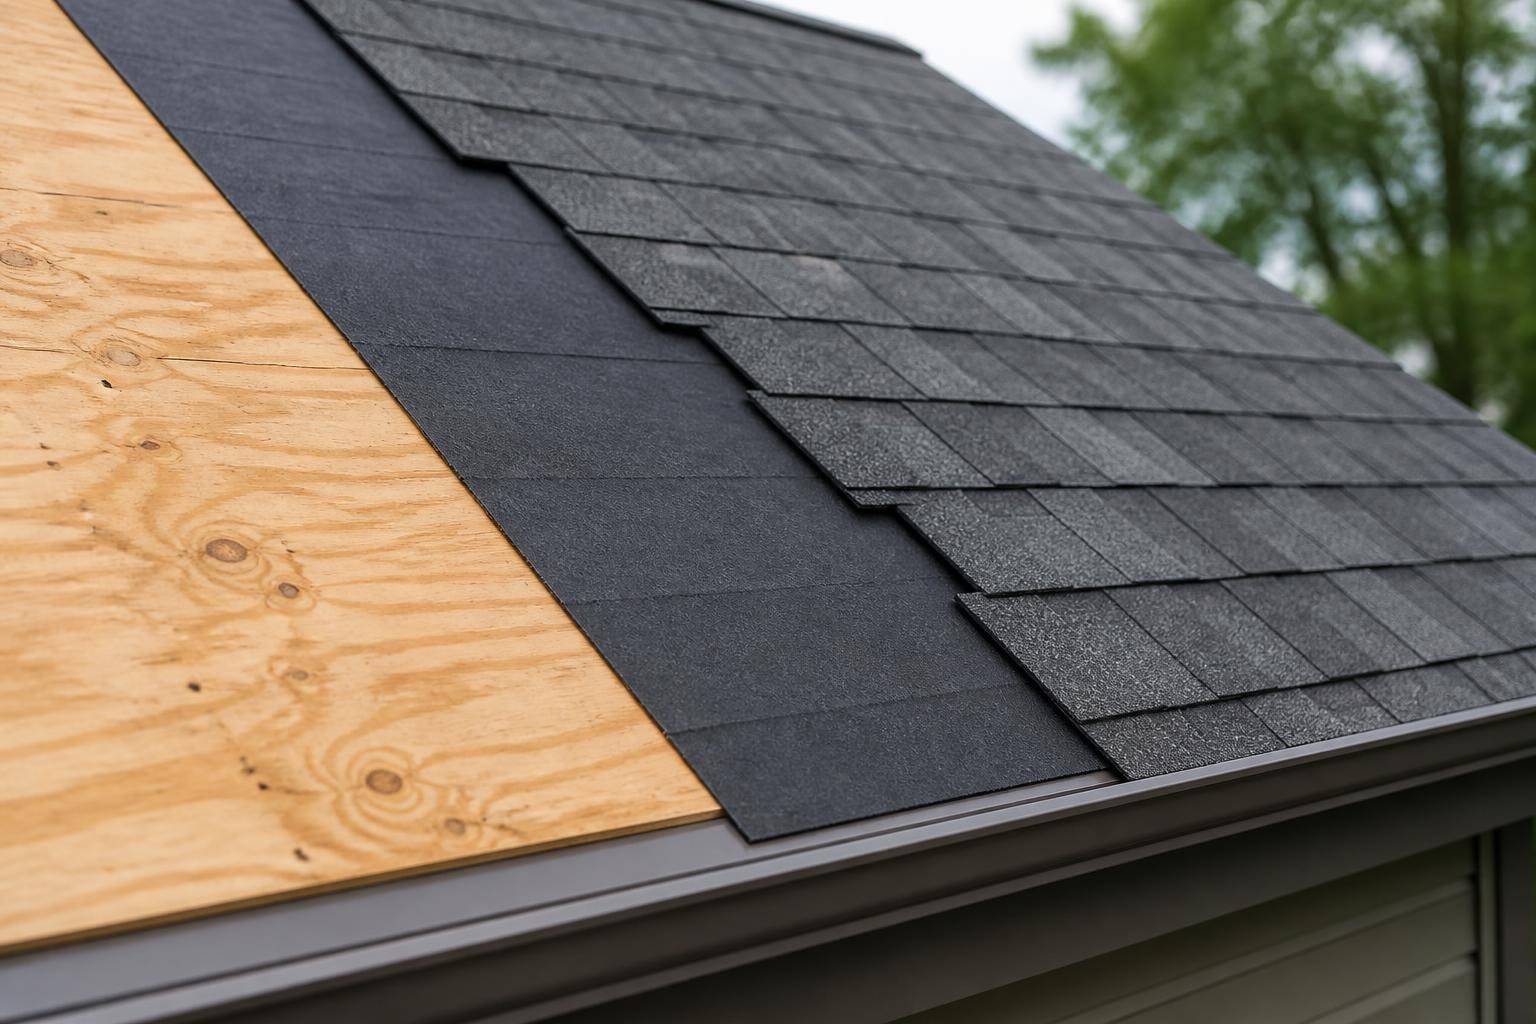
A thorough inspection of your existing roof deck identifies any damaged or deteriorated sheathing that requires replacement. Wood rot, water damage, and structural weaknesses compromise the integrity of your entire roofing system, regardless of how well the shingles are installed. Professional contractors examine every square foot of decking, replacing compromised sections with properly rated plywood or oriented strand board (OSB).
The deck surface must be clean, dry, and free from protruding nails or debris. Any uneven areas should be addressed before proceeding with underlayment installation. This attention to detail prevents future issues like nail pops, uneven shingle courses, and premature failure.
Key preparation steps include:
- Removing all old roofing materials down to the deck
- Inspecting and replacing damaged sheathing boards
- Ensuring proper spacing between deck panels for thermal expansion
- Verifying adequate roof ventilation systems
- Installing drip edge along eaves and rake edges
Underlayment Selection and Application
Modern shingle installation relies heavily on quality underlayment to provide a secondary water barrier. The choice between traditional felt paper and synthetic underlayment impacts both installation efficiency and long-term performance. Synthetic underlayments offer superior tear resistance, UV protection during extended installation periods, and better traction for workers.
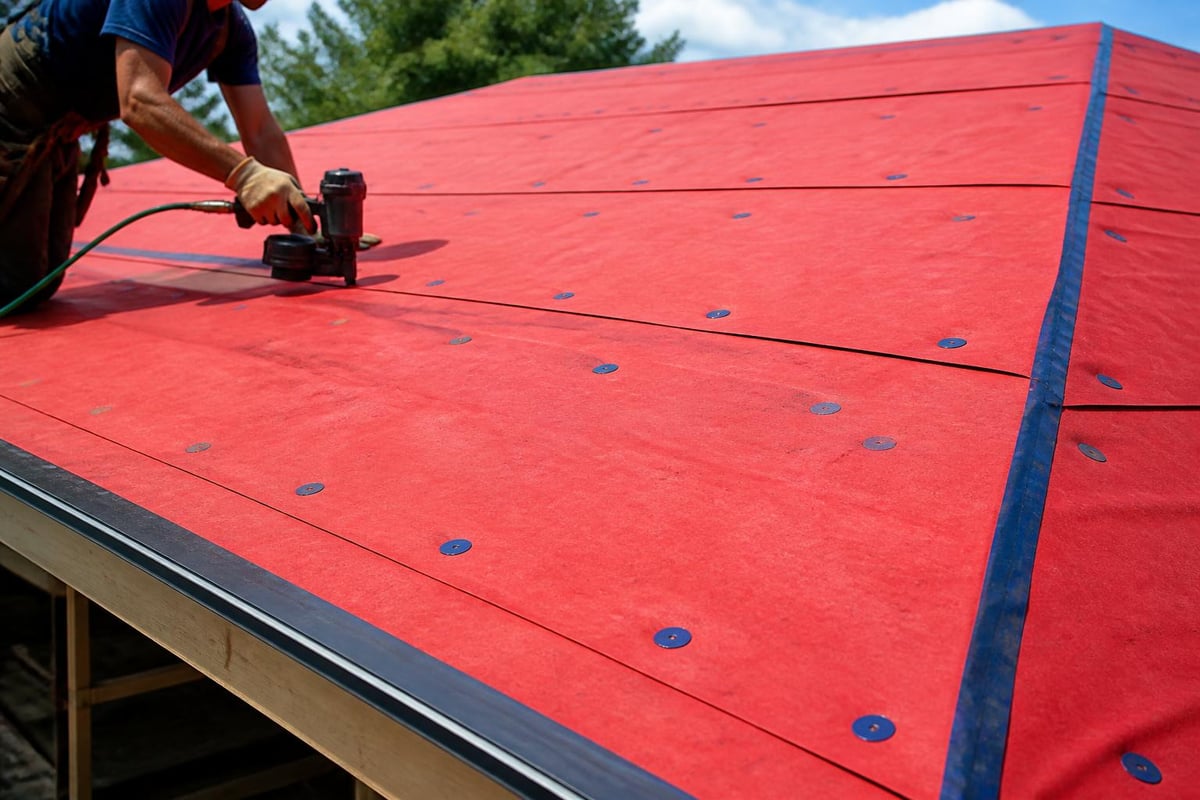
Application begins at the eaves with a starter course that extends beyond the drip edge. Each subsequent course overlaps the previous one by at least 4 inches horizontally, with vertical seams offset by minimum 6 feet. In areas prone to ice damming, many contractors install a rubberized ice and water shield extending 24 inches past the interior wall line.
Shingle Types and Selection Criteria
Modern roofing markets offer diverse shingle options, each with specific installation requirements and performance characteristics. Understanding these differences helps property owners make informed decisions aligned with their budget, aesthetic preferences, and regional climate conditions.
Comparing Asphalt Shingle Categories
| Shingle Type | Weight (per square) | Lifespan | Wind Rating | Installation Complexity |
|---|---|---|---|---|
| 3-Tab | 200-250 lbs | 15-20 years | 60-70 mph | Low |
| Architectural | 350-450 lbs | 25-30 years | 110-130 mph | Moderate |
| Premium/Designer | 400-550 lbs | 30-50 years | 110-130 mph | Moderate-High |
Three-tab shingles represent the most economical option, featuring a uniform flat appearance and straightforward installation process. Architectural shingles provide enhanced dimensional appearance with multiple layers, offering superior wind resistance and longevity. Premium designer shingles replicate the appearance of slate or cedar while maintaining the durability and affordability of asphalt composition.
Climate considerations significantly influence shingle selection. Properties in areas experiencing high winds, extreme temperature fluctuations, or heavy snow loads require shingles rated for those specific conditions. Best practices for attachment in high-velocity wind zones emphasize the importance of proper fastening patterns and adhesive strips.
The Installation Process Step by Step
Executing proper shingle installation requires methodical attention to manufacturer specifications and industry best practices. Deviation from established guidelines often results in premature failure, voided warranties, and costly repairs.
Starting at the Bottom: Starter Strip Installation
The starter course establishes the foundation for your entire roofing system. Specialized starter strips or reversed full shingles create a continuous adhesive surface along the eaves, preventing wind-driven rain from infiltrating beneath the first course of field shingles.
Proper starter strip installation involves:
- Positioning the strip to overhang the drip edge by approximately 3/4 inch
- Aligning the adhesive portion to bond with the first course of shingles
- Securing with fasteners placed according to manufacturer specifications
- Ensuring continuous coverage along all eaves and rake edges
- Verifying proper seal-down before proceeding to field shingles
Field Shingle Application Techniques
Field shingle installation progresses from bottom to top, with each course overlapping the previous one. Common mistakes in shingle application often involve improper nailing patterns, incorrect exposure measurements, and failure to maintain straight course lines.
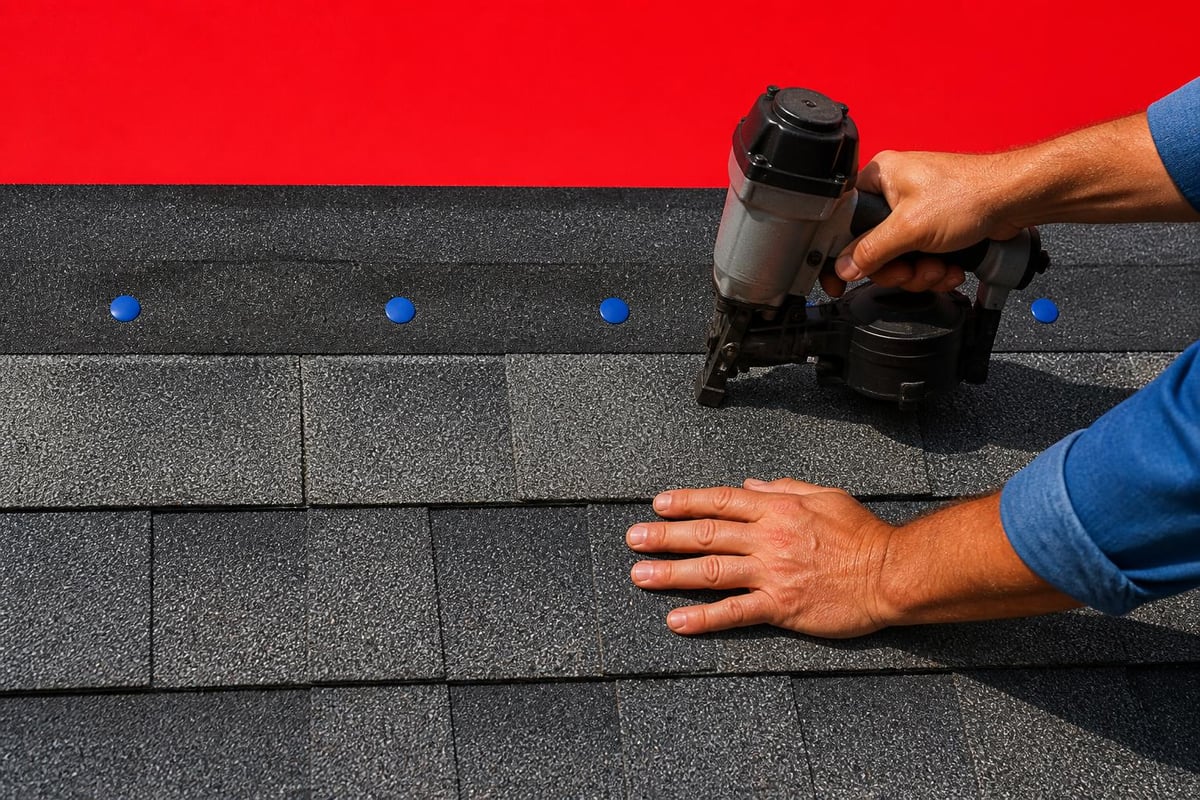
Nailing specifications are critical:
- Use minimum 1-1/4 inch galvanized or stainless steel roofing nails
- Drive nails straight and flush, not angled or overdriven
- Place four to six fasteners per shingle based on manufacturer requirements
- Position nails in the nailing zone, typically 5-5/8 to 6 inches from bottom edge
- Increase fastener count in high-wind regions per local building codes
Each shingle must align vertically to prevent water channeling. Offset patterns typically stagger seams by 6 inches between courses, creating a random appearance while maintaining structural integrity. Maintaining consistent exposure measurements across the entire roof ensures uniform appearance and optimal weather protection.
Ridge Cap and Hip Installation
Ridge caps provide finished appearance while protecting vulnerable peak areas from water infiltration. Purpose-made ridge cap shingles offer superior performance compared to field shingles cut to size. These specialized products bend more easily over ridges and hips while providing enhanced wind resistance.
Installation begins at the ends or hips, working toward the ridge peak. Each cap shingle overlaps the previous one by approximately 5 inches, with two nails securing each piece on either side of the ridge. The final cap shingle receives additional adhesive to prevent wind uplift in this critical location.
Quality Control and Common Installation Errors
Even experienced contractors occasionally encounter challenges during shingle installation. Recognizing potential issues before they become problems separates quality installations from those requiring premature roof repair or replacement.
Avoiding Critical Installation Mistakes
Temperature plays a significant role in installation quality. Installing shingles in extreme cold prevents proper adhesive activation, while excessive heat makes shingles prone to scuffing and tearing. Manufacturers typically recommend installation when temperatures remain above 40°F, with special precautions for cold-weather applications.
Most frequent installation errors include:
- Improper fastener placement outside the nailing zone
- Overdriven or underdriven nails that compromise holding power
- Insufficient ventilation leading to premature shingle deterioration
- Failure to offset shingle seams adequately between courses
- Mixing shingles from different dye lots creating color variation
- Inadequate flashing around penetrations and valleys
Valley treatments require particular attention. Open valley systems use metal flashing with shingles cut at appropriate angles, while closed valleys weave or cut shingles across the valley centerline. Each method demands precise execution to prevent leaks in these high-water-flow areas.
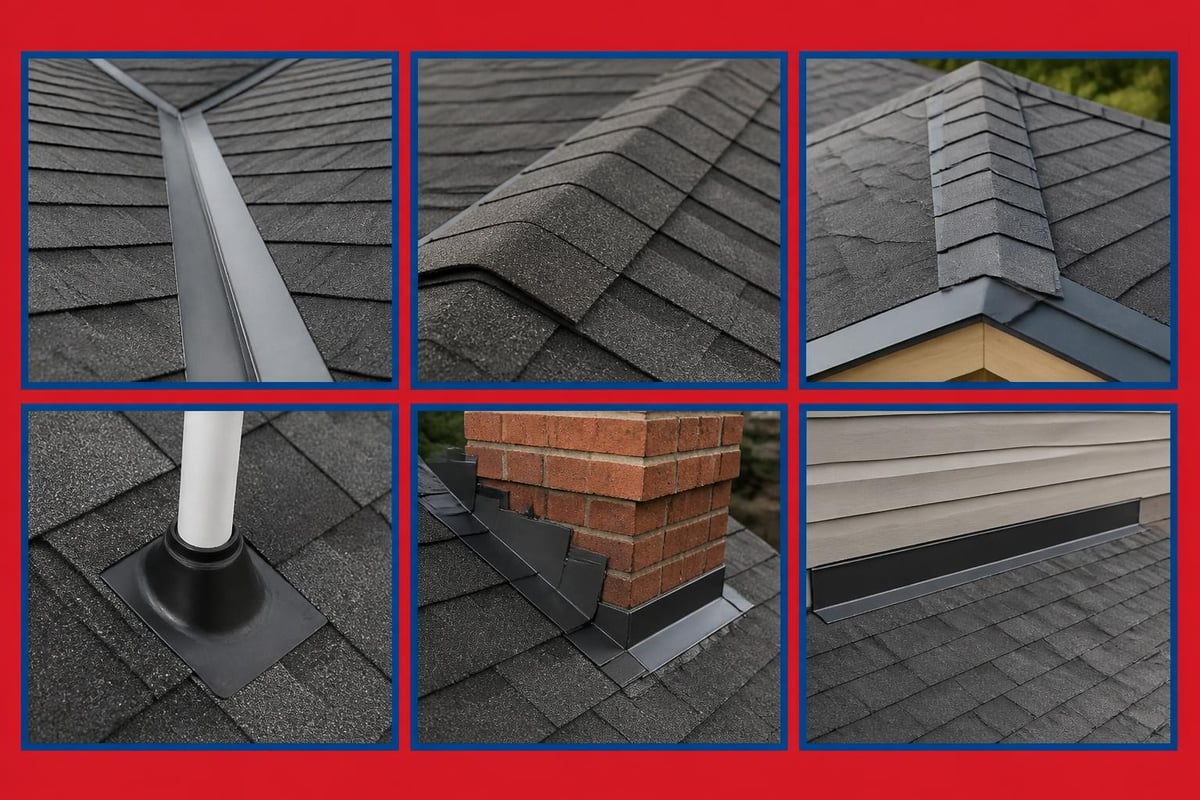
Flashing Integration and Penetration Details
Professional shingle installation incorporates proper flashing around chimneys, skylights, plumbing vents, and other roof penetrations. Step flashing integrates with shingle courses along vertical walls and chimneys, with each piece overlapping the next and extending beneath the shingles above.
| Penetration Type | Flashing Method | Critical Details |
|---|---|---|
| Plumbing Vents | Rubber boot or lead collar | Seal perimeter with roofing cement |
| Chimneys | Step and counter flashing | Install crickets on upslope side |
| Skylights | Manufacturer-specific kit | Follow instructions precisely |
| Wall Intersections | Step flashing | Integrate with wall cladding |
The detailed guide on asphalt shingle installation emphasizes that flashing failures account for a significant percentage of leak claims. Proper integration ensures water flows over and around obstacles without penetrating the roof deck.
Specialized Installation Scenarios
Not all roofs present straightforward installation conditions. Complex architectural features, unusual pitch angles, and specific material choices demand adapted techniques and additional expertise.
Working with Architectural and Designer Shingles
Installing architectural shingles requires attention to alignment and pattern consistency. These dimensional products create shadow lines that enhance curb appeal but demand careful placement to maintain uniform appearance. Starting each course from the same side of the roof and checking alignment frequently prevents pattern disruptions visible from ground level.
Premium designer shingles replicating slate or shake appearances often require specialized cutting tools and installation techniques. Some manufacturers mandate specific training or certification before contractors can offer warranty coverage on these high-end products.
Low-Slope and Cedar Shingle Considerations
While standard asphalt shingles require minimum roof pitch of 2:12 (2 inches of rise per 12 inches of horizontal run), low-slope applications demand additional underlayment protection and modified installation techniques. Double underlayment layers and reduced exposure measurements help compensate for slower water runoff on these challenging roofs.
Cedar shingle installation follows different principles than asphalt products. Best practices for cedar shingles and shakes emphasize proper spacing for expansion, specialized fastening techniques, and treatment considerations for enhanced fire resistance and longevity.
Safety Protocols and Professional Considerations
Shingle installation involves significant safety risks that require proper equipment, training, and protocols. Professional contractors maintain comprehensive safety programs protecting workers while delivering quality results for property owners.
Fall Protection and Worksite Safety
All workers on roof surfaces must utilize appropriate fall protection when working above 6 feet elevation. Personal fall arrest systems, guardrails, or safety net systems prevent injuries from this leading cause of construction accidents. Proper equipment includes full-body harnesses, anchor points rated for intended loads, and shock-absorbing lanyards.
Beyond fall protection, roofing work demands:
- Proper ladder placement and securing at appropriate angles
- Tool lanyards preventing dropped object injuries
- Electrical safety around overhead power lines
- Heat stress prevention during summer installations
- Appropriate footwear with slip-resistant soles
When to Choose Professional Installation
While some property owners consider DIY shingle installation, most benefit from professional expertise. Licensed contractors carry liability insurance, workers compensation coverage, and manufacturer certifications that protect homeowners from financial risk. Additionally, warranty coverage often requires professional installation to remain valid.
Storm damage repairs particularly benefit from contractor expertise. Insurance claims, emergency tarping, and comprehensive damage assessment require experience navigating both technical and administrative challenges. Professional contractors document damage thoroughly, work directly with insurance adjusters, and ensure all related issues receive proper attention.
Post-Installation Inspections and Maintenance
Completing shingle installation represents the beginning of your roof's service life rather than the end of the project. Proper inspection, maintenance, and monitoring ensure you receive full value from your investment.
Final Quality Verification
Comprehensive post-installation inspection verifies every aspect of the project meets industry standards and manufacturer specifications. Professional contractors conduct systematic reviews examining:
- Overall appearance and pattern consistency from multiple vantage points
- Proper fastener placement and seal-down along all courses
- Complete flashing integration around penetrations and transitions
- Adequate ventilation intake and exhaust component installation
- Clean worksite with all debris removed from property
Many quality contractors provide documentation including photographs, warranty information, and maintenance recommendations. This creates valuable records for future reference and potential property sale.
Long-Term Maintenance Requirements
While quality shingle installation delivers decades of reliable performance, periodic maintenance extends service life and prevents minor issues from becoming major problems. Annual inspections identify loose or damaged shingles, clogged gutters affecting drainage, and vegetation growth requiring removal.
Recommended maintenance schedule:
- Biannual visual inspections from ground level
- Professional inspection every 3-5 years
- Immediate assessment after severe weather events
- Prompt repair of identified damage or deficiencies
- Gutter cleaning to ensure proper water flow
Property owners should avoid walking on their roofs unnecessarily, as foot traffic damages granule surfaces and can dislodge properly sealed shingles. When roof access becomes necessary, professionals use proper techniques and equipment minimizing impact on the roofing system.
Regional Considerations for Installation Success
Geographic location significantly influences shingle installation requirements and best practices. Climate conditions, local building codes, and regional weather patterns demand adapted approaches for optimal performance.
Climate-Specific Installation Adaptations
Northern climates experiencing freeze-thaw cycles require enhanced ice dam protection with extended ice and water shield coverage. Many contractors in these regions install waterproof membranes covering the entire roof deck, particularly on lower-slope sections where ice accumulation poses greatest risk.
Southern regions face different challenges. Intense UV exposure, high heat, and hurricane-force winds demand shingles with enhanced IR-reflective granules, superior adhesive formulations, and upgraded wind ratings. Understanding heat impact on roofs helps property owners select appropriate materials and colors for their climate.
Building codes vary significantly between jurisdictions. Some municipalities require specific wind ratings, minimum shingle weights, or enhanced attachment patterns. Professional contractors maintain current knowledge of local requirements ensuring every installation meets or exceeds applicable standards.
Working with Local Weather Patterns
Installation timing often determines project success. Spring and fall typically offer ideal conditions with moderate temperatures and lower precipitation probability. However, urgent repairs can't always wait for perfect weather.
Professional contractors monitor weather forecasts continuously during active projects, prepared to secure partially completed work when unexpected weather arrives. Temporary protection prevents water intrusion to exposed deck areas while maintaining worker safety during challenging conditions.
Understanding the complexities of proper shingle installation helps property owners appreciate the craftsmanship and expertise required for lasting roofing systems. From meticulous deck preparation through final ridge cap placement, every step contributes to decades of reliable weather protection. Whether you need a complete roof replacement or expert repairs, partnering with experienced professionals ensures your investment delivers maximum value and performance. Great Roofing brings family-owned dedication and proven expertise to every project throughout the Joliet area, combining quality materials with superior installation techniques for roofing systems that stand the test of time.