


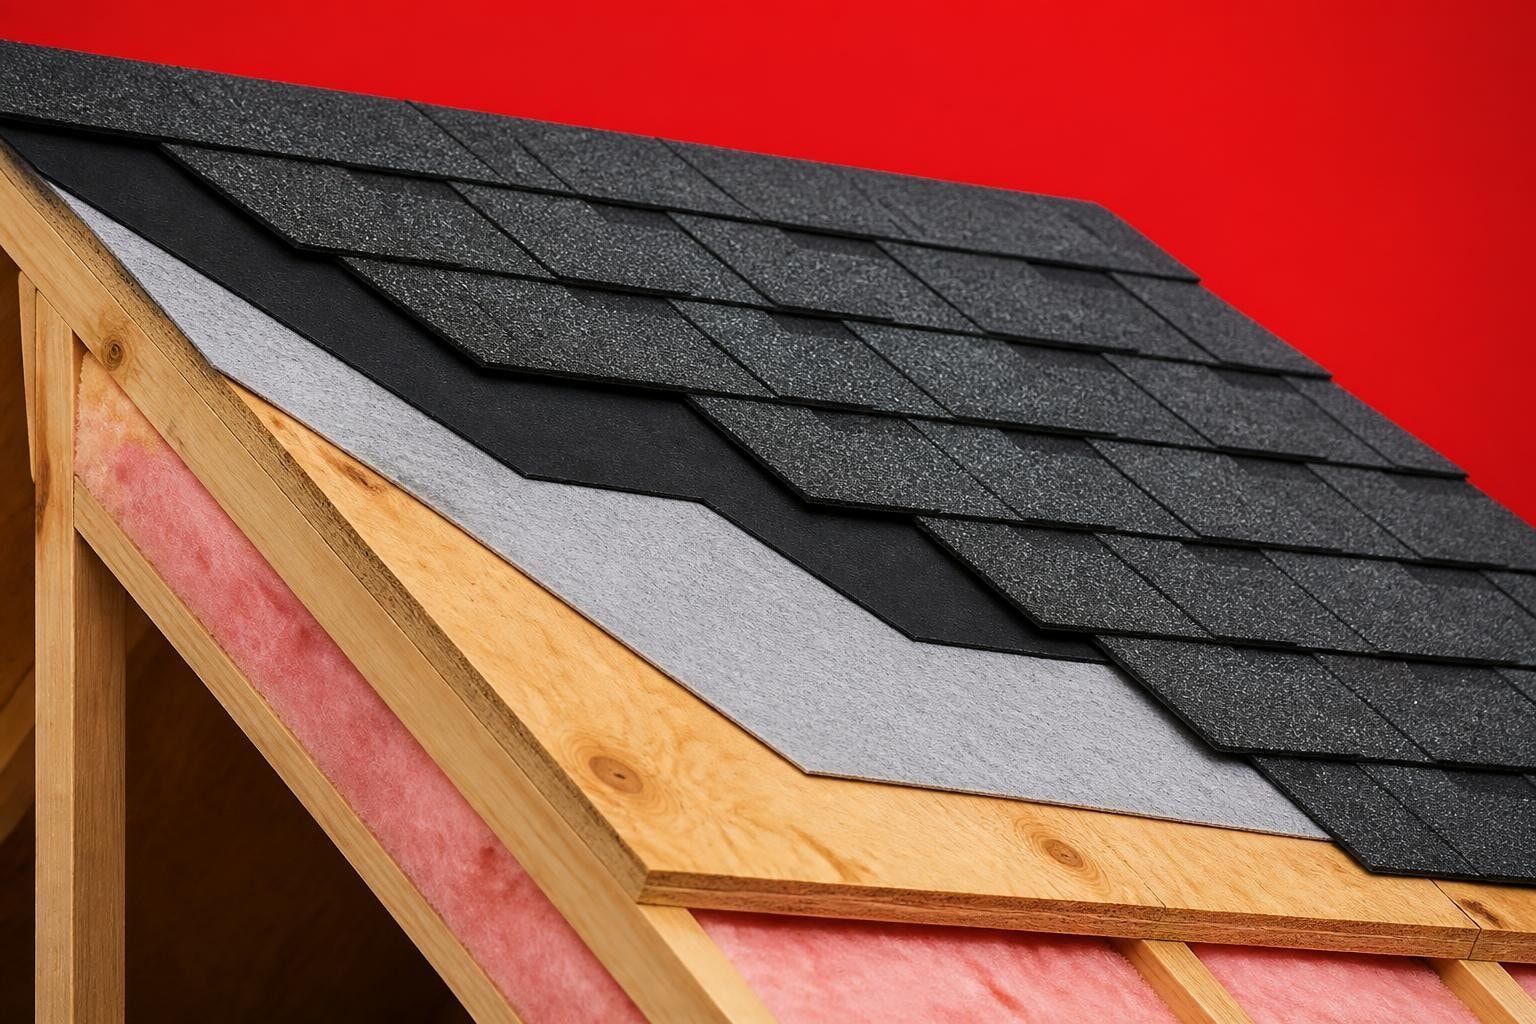
Understanding the intricate asphalt shingle roof detail is essential for homeowners, contractors, and building professionals who want to ensure long-lasting, weather-resistant roofing systems. Every component, from the underlying deck to the visible shingles, plays a critical role in protecting your property from the elements. Whether you're planning a new installation, evaluating repair needs, or simply want to understand what makes a quality roof, this comprehensive guide breaks down every layer, connection point, and critical specification that defines professional asphalt shingle roofing.
The Foundation: Roof Deck and Structural Components
The roof deck serves as the foundation for your entire roofing system and directly impacts how well your asphalt shingle roof detail performs over decades of use. Most modern residential roofs use oriented strand board (OSB) or plywood sheathing, which provides the structural surface to which all other materials attach.
Deck spacing and fastening requirements include:
- Panel edges must land on rafters or trusses
- Minimum 8d nails or equivalent fasteners
- Proper spacing to allow for thermal expansion
- H-clips between unsupported panel edges on spans over 48 inches
Before any roofing materials go down, contractors inspect the deck for damage, rot, or inadequate fastening. The deck must be smooth, dry, and properly ventilated from below to prevent moisture accumulation that could compromise the entire system.
Ventilation Integration
Proper ventilation works hand-in-hand with asphalt shingle roof detail to regulate temperature and moisture. A well-ventilated roof prevents ice dams in winter, reduces cooling costs in summer, and extends shingle life by preventing premature deterioration from excessive heat buildup.
Ridge vents, soffit vents, and proper attic airflow create a balanced system where cooler air enters at the eaves and warmer air exits at the peak. The recommended ventilation ratio is one square foot of net free ventilation area for every 150 square feet of attic space.

Underlayment: The Critical Moisture Barrier
The underlayment layer represents one of the most important aspects of asphalt shingle roof detail that homeowners rarely see but absolutely depend on. This water-resistant or waterproof barrier provides secondary protection if water penetrates the shingle layer.
| Underlayment Type | Best Use | Key Features | Typical Cost Range |
|---|---|---|---|
| Asphalt-saturated felt (#15 or #30) | Standard applications | Traditional, breathable | $ |
| Synthetic underlayment | Most residential projects | Lighter, stronger, slip-resistant | $$ |
| Self-adhering membrane | Valleys, eaves, penetrations | Waterproof seal, ice dam protection | $$$ |
| Rubberized asphalt | High-risk areas | Superior waterproofing | $$$ |
Modern best practices for asphalt shingle installation emphasize synthetic underlayment for its superior tear resistance and UV stability. Unlike traditional felt, synthetic materials won't absorb moisture and can remain exposed during construction delays without degrading.
Ice and Water Shield Application
In cold climates, self-adhering ice and water shield protects vulnerable areas where ice dams typically form. Professional installers apply this waterproof membrane from the eave edge extending up the roof at least 24 inches beyond the interior wall line. Valleys, dormers, skylights, and penetrations also receive this premium protection.
The adhesive backing creates a watertight seal around fasteners, preventing water intrusion even when ice prevents normal drainage. This critical asphalt shingle roof detail prevents thousands of dollars in water damage during harsh winter conditions.
Drip Edge and Eave Protection
Metal drip edge might seem like a minor detail, but it plays multiple crucial roles in comprehensive asphalt shingle roof detail. This L-shaped or T-shaped metal flashing directs water away from fascia boards and into gutters while providing a clean, finished appearance at roof edges.
Installation sequence matters:
- Install drip edge along eaves before underlayment
- Secure with roofing nails every 8-12 inches
- Overlap sections by 2 inches minimum
- Install rake drip edge over underlayment at gable ends
The drip edge prevents water from wicking back under shingles and rotting roof decking or fascia. It also provides a straight, rigid edge that helps maintain proper shingle alignment during installation.
Starter Strip: Establishing the First Course
The starter strip creates the foundation for proper shingle adhesion and wind resistance along eaves and rakes. This specialized asphalt shingle roof detail ensures the first course of field shingles has adequate adhesive backing and creates a uniform appearance.
Professional contractors use either dedicated starter strip products or cut standard three-tab shingles to create starter courses. Dedicated starter strips offer superior wind resistance because they're specifically designed with a continuous adhesive strip that bonds with the first course of shingles.
Installation begins at the eave edge, with the starter strip extending 1/4 to 3/8 inch beyond the drip edge to promote proper water runoff. This overhang prevents water from being drawn back under the roof edge through capillary action.
Field Shingle Installation Techniques
The visible field shingles represent the most recognizable aspect of asphalt shingle roof detail, but proper installation requires precision and attention to manufacturer specifications. Understanding the anatomy of modern asphalt shingles helps contractors appreciate why specific installation methods matter.
Nailing Pattern and Placement
Correct nailing directly impacts wind resistance and shingle longevity. Each shingle requires four to six fasteners depending on roof slope and wind exposure.
- Standard nailing zone: 5/8 to 1 inch below the adhesive strip
- High-wind areas: Six nails per shingle
- Nail depth: Flush with shingle surface, not overdriven or raised
- Fastener type: Minimum 12-gauge galvanized roofing nails with 3/8-inch heads
Overdriven nails tear the shingle mat and create entry points for water. Underdriven nails leave fastener heads exposed where they can back out or allow wind to lift shingles. Professional roofing and siding services use pneumatic nailers calibrated to drive fasteners to the correct depth consistently.
Shingle Alignment and Offset Patterns
Maintaining straight courses and proper offset prevents water channeling and creates professional aesthetics. Most architectural shingles use a random offset pattern while three-tab shingles traditionally use a 6-inch offset.
Contractors snap chalk lines every few courses to maintain alignment and compensate for any irregularities in roof geometry. Vertical alignment matters just as much as horizontal-misaligned shingles create visible wavy patterns that detract from curb appeal and may indicate installation deficiencies.
Valley Treatment Methods
Valleys channel tremendous water volume during storms, making valley treatment one of the most critical aspects of asphalt shingle roof detail. Three primary methods offer different benefits and complexity levels.
| Valley Method | Water Handling | Aesthetics | Complexity | Durability |
|---|---|---|---|---|
| Open valley (metal) | Excellent | Visible flashing | Moderate | Excellent |
| Woven valley | Very good | Seamless | High | Good |
| Closed-cut valley | Very good | Clean lines | Moderate | Very good |
Open valleys use metal flashing (typically 24-gauge galvanized steel or aluminum) running the valley length with shingles trimmed back 2-3 inches on each side. This method provides the best water flow and easiest future repairs, though the visible metal may not suit all architectural styles.
Woven valleys interlock shingles from adjacent roof planes, creating a completely shingled appearance. This labor-intensive technique requires skilled installation but offers excellent weather protection when executed properly.
Valley Ice and Water Shield
Regardless of valley method, professional installers place ice and water shield centered on the valley, extending at least 18 inches on each side of the valley centerline. This waterproof barrier protects against wind-driven rain and provides backup protection if shingles fail or water backs up behind ice dams.
Ridge Cap and Hip Detail
Ridge caps complete the asphalt shingle roof detail where two roof planes meet at horizontal ridges or sloped hips. These specialized shingles bend more easily than field shingles and provide weather protection while creating finished aesthetics.
Proper ridge cap installation includes:
- Cutting field shingles at the ridge line, leaving no gaps
- Installing ridge vent if specified in ventilation plan
- Applying ridge cap shingles starting from the end opposite prevailing winds
- Using a 5-inch exposure with 6-7 inch overlap
- Securing each cap with two nails positioned 1 inch from each edge and 5.5 inches from the exposed end
High-profile ridge caps create dimensional appearance matching architectural shingles and often include enhanced wind resistance ratings. The final ridge cap receives four nails or adhesive sealant to prevent wind uplift at this vulnerable termination point.
Flashing: Protecting Penetrations and Transitions
Flashing creates weathertight transitions where the roof meets walls, chimneys, plumbing vents, and other penetrations. Quality flashing represents critical asphalt shingle roof detail that prevents the majority of leak issues over a roof's lifespan.
Pipe Boot and Vent Flashing
Plumbing vents require specialized flashing boots with rubber or EPDM seals that accommodate the pipe while shedding water. The flashing base slides under shingles above the penetration and over shingles below, integrating with the shingled surface.
Step flashing protects sidewalls and chimney bases with individual L-shaped pieces that interweave with each shingle course. Each piece overlaps the previous one by 3 inches minimum, creating a shingled effect that directs water down and away from the wall intersection.
Continuous Flashing and Kickout Details
Where roof planes meet vertical walls, continuous flashing or multiple step flashing pieces protect the joint. Kickout flashing at the bottom of wall-to-roof intersections directs water away from the wall and into gutters rather than allowing it to run behind siding.
Counter-flashing caps step flashing at masonry walls and chimneys, embedding into mortar joints or attaching to the vertical surface to create a sealed overlap that prevents water entry from above. Professional roof repair service providers inspect these details carefully during maintenance visits because flashing failures cause most roof leaks.
Installation Temperature and Weather Considerations
Temperature significantly affects asphalt shingle roof detail during installation and long-term performance. Shingles contain asphalt adhesive that requires specific temperature ranges to seal properly.
Most manufacturers specify installation temperatures between 40°F and 85°F. Below 40°F, shingles become brittle and may crack during handling. The adhesive strips won't activate properly in cold conditions, requiring manual sealing with roofing cement. Installation tips for asphalt shingle roofs emphasize temperature management for optimal results.
Extreme heat above 85°F makes shingles susceptible to scuffing and tearing during installation. Installers must take extra care not to damage the granule surface or distort shingles when walking on hot roofs.
Quality Control and Inspection Points
Professional contractors implement quality checks throughout installation to ensure every asphalt shingle roof detail meets specifications. These inspection points catch issues before they become expensive callbacks or warranty problems.
- Deck inspection: Check for proper fastening, smoothness, and damage
- Underlayment verification: Confirm proper overlap, fastening, and coverage
- Starter strip alignment: Verify straight installation and proper overhang
- Fastener inspection: Random checks for correct placement and depth
- Course alignment: Monitor every 3-5 courses with chalk lines
- Valley examination: Ensure proper ice and water shield and shingle cuts
- Flashing review: Verify all penetrations properly flashed before covering
- Final walkthrough: Check ridge caps, ensure no exposed fasteners, remove debris
Many professional roof installation companies use photographic documentation at key installation stages, providing homeowners with verification that proper procedures were followed throughout the project.
Common Installation Mistakes to Avoid
Even experienced contractors can make errors that compromise asphalt shingle roof detail. Understanding common mistakes helps homeowners recognize quality workmanship and contractors avoid costly callbacks.
Frequent installation errors include:
- Installing shingles outside manufacturer temperature specifications
- Incorrect fastener placement outside the nailing zone
- Failing to remove old shingles when required by code or warranty
- Inadequate starter strip or missing starter at rakes
- Improper valley installation allowing water intrusion
- Skipping ice and water shield in vulnerable areas
- Mixing shingles from different dye lots creating color variations
- Insufficient ventilation causing premature shingle failure
Detailed guides to shingle installation provide step-by-step instructions that help contractors avoid these pitfalls and deliver professional results.
Warranty Considerations and Documentation
Manufacturer warranties depend on proper installation following published specifications. Deviations from approved asphalt shingle roof detail can void coverage, leaving homeowners responsible for premature failures.
Material warranties typically cover manufacturing defects for 25-50 years, while workmanship warranties from contractors cover installation errors for 1-10 years. The best protection combines both coverages with documentation proving compliance with installation standards.
Contractors should provide homeowners with:
- Manufacturer specification sheets for installed products
- Installation photographs showing proper technique
- Ventilation calculations demonstrating adequate airflow
- Warranty registration confirmation
- Maintenance recommendations for long-term performance
When working with experienced shingle roofing contractors, homeowners receive comprehensive documentation protecting their investment and ensuring warranty coverage remains valid throughout the coverage period.
Long-Term Maintenance and Inspection
Proper asphalt shingle roof detail continues beyond installation through regular maintenance and inspection. Proactive care extends roof life and catches small issues before they become major problems.
Annual inspection checklist:
- Examine shingles for curling, cracking, or missing granules
- Check flashing around penetrations and valleys
- Clear debris from valleys and gutters
- Inspect attic for moisture stains or mold
- Verify adequate ventilation function
- Look for lifted or damaged shingles after storms
- Check ridge caps for secure fastening
Professional roof leak repair specialists recommend homeowners schedule biannual inspections in spring and fall to identify weather damage and prepare the roof for upcoming season extremes. Minor repairs performed promptly prevent water intrusion and expensive interior damage.
Mastering asphalt shingle roof detail ensures durable, weather-resistant roofing systems that protect homes for decades. From structural decking through finished ridge caps, every component and installation technique contributes to overall performance and longevity. Whether you're planning a new roof installation or need expert repairs, the experienced team at Great Roofing brings the precision and attention to detail your Joliet property deserves. Contact us today for a comprehensive evaluation and discover how proper installation techniques protect your investment for years to come.