

Your home's most critical defense system sits directly above your head, protecting everything you value from the elements. Understanding how to properly care for my roof isn't just about preventing leaks-it's about preserving my investment, maintaining structural integrity, and ensuring my family's safety. Whether you own a residential property with asphalt shingles or manage a commercial building with modified bitumen, knowing the fundamentals of roof care empowers you to make informed decisions that extend the lifespan of this essential system. This comprehensive guide explores inspection techniques, maintenance protocols, common problems, and when to call professionals for help.
Understanding My Roof's Structure and Components
Every roof consists of multiple layers working together to protect your property. The visible exterior-whether shingles, tiles, or membrane-represents just one part of a complex system designed to shed water, resist wind, and provide insulation.
Beneath the surface layer, my roof includes underlayment that serves as a secondary water barrier, preventing moisture from reaching the wooden deck below. The decking itself, typically plywood or OSB boards, provides structural support for all other components. Flashing around chimneys, vents, and valleys creates watertight seals at vulnerable transition points where water tends to accumulate.
Critical Roof Components That Require Attention
Understanding each element helps you identify potential problems before they escalate:
- Shingles or surface material: The first line of defense against weather
- Underlayment: Secondary moisture barrier protecting the deck
- Decking: Structural foundation supporting all roofing materials
- Flashing: Metal strips sealing joints and penetrations
- Ventilation: System regulating temperature and moisture levels
- Gutters and downspouts: Drainage directing water away from the structure
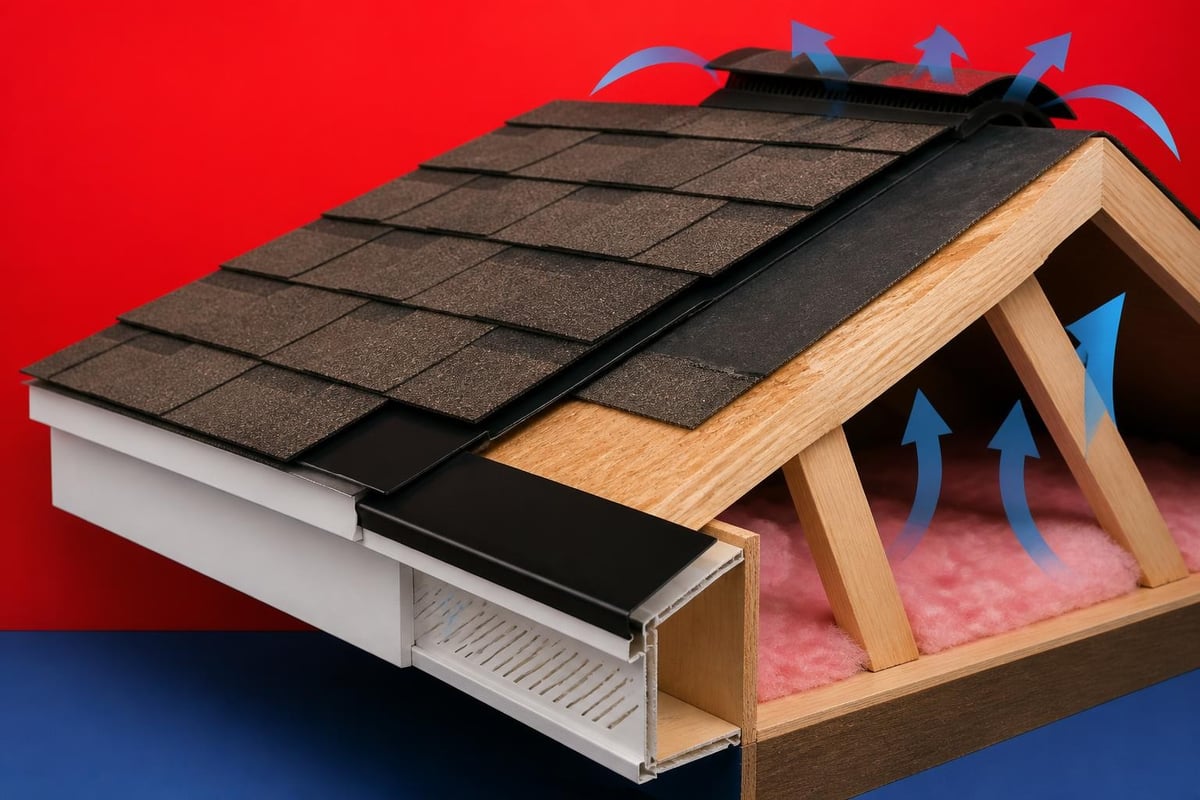
The ventilation system deserves special consideration because improper airflow causes moisture buildup, leading to premature deterioration of my roof from the inside out. Ridge vents, soffit vents, and attic fans work together to maintain proper circulation.
Seasonal Inspection Schedule for My Roof
Regular inspections form the foundation of effective roof maintenance. Scheduling systematic evaluations throughout the year helps you catch minor issues before they require extensive storm damage repair services.
Spring inspections focus on winter damage assessment. After months of snow, ice, and freeze-thaw cycles, my roof may show signs of stress including lifted shingles, damaged flashing, or clogged gutters filled with debris. This season presents the ideal opportunity to identify problems and schedule repairs during moderate weather.
| Season | Inspection Focus | Common Issues | Action Items |
|---|---|---|---|
| Spring | Winter damage assessment | Lifted shingles, ice dam damage, debris buildup | Clean gutters, repair flashing, replace damaged shingles |
| Summer | UV exposure and heat stress | Curling shingles, cracked sealant, ventilation problems | Check attic temperature, inspect sealants, verify airflow |
| Fall | Pre-winter preparation | Loose materials, clogged drains, tree damage | Trim overhanging branches, secure loose elements, clear drainage |
| Winter | Storm monitoring | Ice dams, snow accumulation, leak development | Remove excess snow, watch for interior signs, document damage |
What to Look for During Roof Inspections
Conducting thorough inspections requires knowing which warning signs indicate serious problems. Start from the ground using binoculars to examine my roof's surface for obvious damage patterns.
Missing or damaged shingles appear as dark spots where underlayment shows through, or areas where wind has lifted edges. Granule loss manifests as bare patches on asphalt shingles, indicating the protective layer has worn away and replacement may be necessary. Check your gutters for excessive granule accumulation, which signals aging shingles nearing the end of their lifespan.
Sagging areas suggest structural problems beneath the surface, potentially indicating water damage to the decking or rafters. These situations require immediate professional evaluation to prevent catastrophic failure. Similarly, any daylight visible through the roof boards when viewed from the attic indicates gaps that compromise weather protection.
Common Problems Affecting My Roof's Performance
Even with regular maintenance, various issues can compromise my roof's effectiveness. Recognizing these problems early enables timely intervention that prevents minor concerns from becoming major expenses.
Weather-Related Damage and Deterioration
Illinois weather presents unique challenges for roofing systems. Severe thunderstorms bring high winds that can lift shingles, exposing underlayment to moisture. Hail damage to shingle roofs appears as circular bruises or dents, compromising the granule coating and accelerating weathering.
Wind damage often concentrates along roof edges and ridges where uplift forces are strongest. After significant storms, walk your property's perimeter to identify lifted or missing shingles. Document any damage with photographs for insurance purposes and potential claims.
Water infiltration represents the most destructive force affecting my roof. Once moisture penetrates the outer layers, it attacks decking, insulation, and interior structures. Signs of roof leaks include water stains on ceilings, musty odors in the attic, and visible mold growth on rafters.
- Storm damage indicators: Missing shingles, dented flashing, torn underlayment
- Age-related wear: Curling edges, cracked surfaces, granule loss
- Installation defects: Improper nailing, inadequate sealant, poor flashing
- Biological growth: Moss, algae, or lichen retaining moisture
Ventilation and Moisture Management Issues
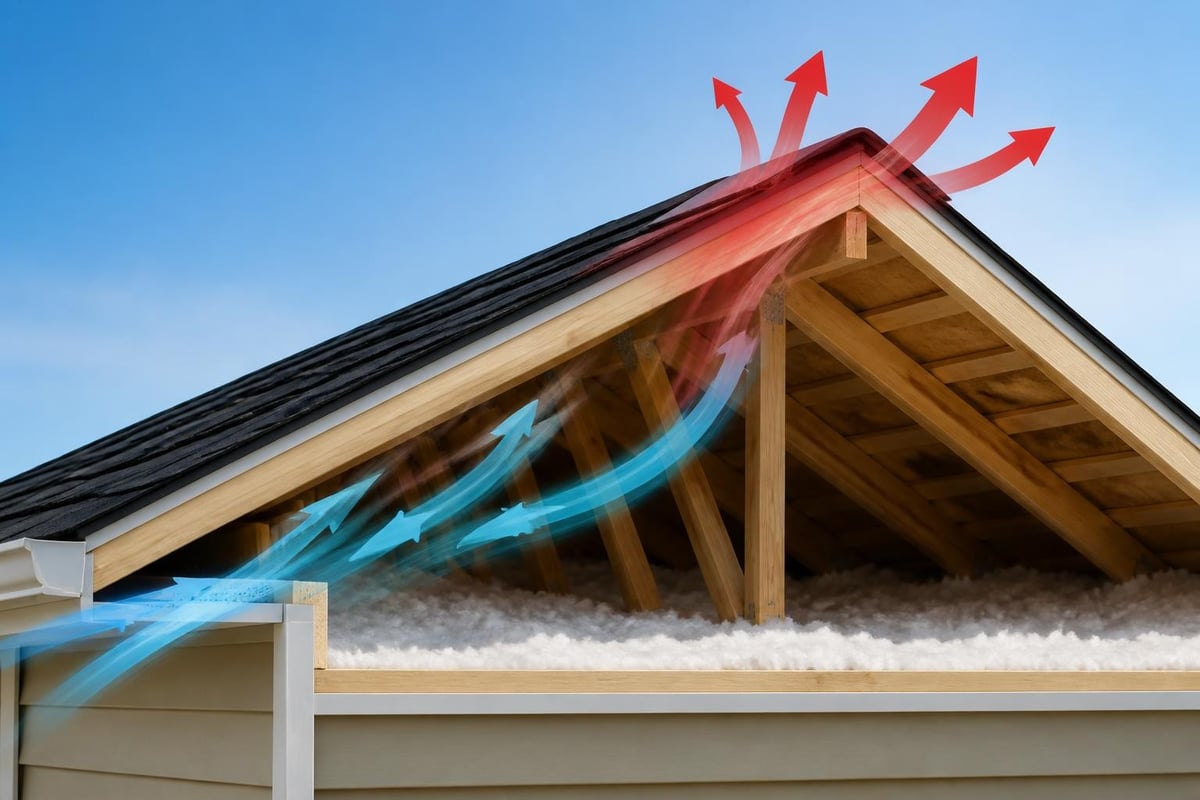
Poor ventilation creates conditions where my roof deteriorates from within. During summer, inadequate airflow allows attic temperatures to exceed 150°F, causing shingles to age prematurely and adhesives to fail. Winter condensation from warm interior air meeting cold roof decking promotes rot and mold.
Proper ventilation maintains balanced airflow, typically requiring one square foot of ventilation per 150 square feet of attic space. Intake vents at soffits draw cool air while exhaust vents at the ridge release hot air, creating continuous circulation.
Preventive Maintenance Tasks for My Roof
Proactive care significantly extends the functional lifespan of my roof while reducing emergency repair needs. Establishing a maintenance routine addresses small problems before they escalate into costly replacements.
Regular gutter cleaning ranks among the most important tasks homeowners can perform. Clogged gutters cause water to back up under shingles, leading to rot and leaks. Clean gutters at least twice yearly-spring and fall-or more frequently if trees overhang my roof.
DIY Maintenance vs. Professional Services
Some tasks suit homeowner capability while others require professional expertise. Understanding this distinction protects both your safety and your roof's integrity.
Safe DIY tasks include:
- Cleaning gutters and downspouts from a stable ladder
- Removing light debris like leaves and small branches
- Inspecting for obvious damage from ground level
- Documenting problems with photographs
- Trimming tree branches that touch or overhang my roof
Tasks requiring professionals:
- Walking on steep or high roofs
- Replacing damaged shingles or flashing
- Repairing structural elements
- Addressing active leaks
- Conducting comprehensive inspections
Working with certified roofing specialists ensures repairs meet manufacturer specifications and local building codes. Professional contractors carry insurance protecting you from liability if accidents occur during work.
Making Repair vs. Replacement Decisions
Determining whether to repair or replace my roof requires evaluating multiple factors including age, damage extent, and long-term costs. This decision significantly impacts both immediate expenses and future home value.
Calculating the Repair Threshold
Industry professionals use the "25% rule" as a general guideline: if repairs will cost more than 25% of full replacement, and my roof has exceeded 75% of its expected lifespan, replacement typically offers better value. However, this rule requires modification based on specific circumstances.
For example, localized storm damage repairs affecting a small section might make sense even on an older roof if the remaining areas remain sound. Conversely, widespread deterioration on a relatively young roof might indicate installation defects or ventilation problems that simple repairs won't resolve.
| Factor | Repair Makes Sense | Replacement Preferred |
|---|---|---|
| Age of roof | Under 15 years for asphalt shingles | Over 20 years for asphalt shingles |
| Damage extent | Isolated to specific area | Widespread across multiple sections |
| Previous repairs | First or second repair | Multiple repairs creating patchwork |
| Energy efficiency | Current system performing adequately | High utility bills, poor insulation |
| Future plans | Selling within 1-2 years | Staying 5+ years |
Understanding Replacement Costs and Options
When replacement becomes necessary, understanding the cost of asphalt shingles and available alternatives helps you budget appropriately. Material selection affects both upfront investment and long-term performance.
Three-tab asphalt shingles represent the most economical option, offering 15-20 year lifespans with basic weather protection. Architectural shingles provide enhanced durability and aesthetic appeal, lasting 25-30 years with better wind and impact resistance. Premium options like designer shingles or metal roofing deliver 50+ year performance with superior weather resistance.
Commercial properties often benefit from modified bitumen or TPO membrane systems, which handle foot traffic better than residential shingles while providing excellent waterproofing for low-slope applications.
Working with Professional Roofing Contractors
Selecting the right contractor determines whether my roof performs as expected for decades or requires premature replacement. Professional installation and quality materials working together create roofing systems that protect your investment.
Vetting Contractors Before Hiring
Thorough contractor research prevents costly mistakes and ensures quality workmanship. Request multiple detailed estimates that break down labor, materials, and timeline expectations. Legitimate contractors provide written proposals specifying exact materials, warranty coverage, and project scope.
Verify licensing and insurance coverage before allowing any work to begin. Contractors should carry both liability insurance and workers' compensation, protecting you from financial responsibility if accidents occur. Request certificates of insurance and contact the issuing company to confirm active coverage.
Red flags to avoid:
- Pressure to sign immediately or "today only" pricing
- Requests for full payment upfront
- Lack of physical business address or local references
- Unwillingness to provide proof of insurance
- Unusually low bids that seem too good to be true
Positive indicators:
- Established local presence with verifiable address
- Multiple positive reviews from recent customers
- Willingness to explain processes and answer questions
- Clear written contracts detailing all work
- Manufacturer certifications for specific products
Communication Throughout the Project
Maintaining open communication with your contractor ensures my roof project proceeds smoothly. Establish expectations for updates, site cleanliness, and daily work hours before the project begins.
Ask about material protection and weather contingencies. Reputable contractors monitor forecasts and protect open sections if unexpected rain threatens. They should explain how they'll protect landscaping, siding, and windows during tear-off and installation.
Understanding the timeline helps you plan accordingly. Typical residential roof replacements take 1-3 days depending on size, complexity, and weather conditions. Commercial projects may require longer schedules due to size and specialized materials.
Protecting My Roof Investment Long-Term
After installation or repair, implementing protective measures maximizes my roof's lifespan and performance. These strategies prevent accelerated deterioration and maintain manufacturer warranty coverage.
Documentation and Warranty Management
Maintaining comprehensive records protects your investment and simplifies future service needs. Create a dedicated file containing installation contracts, material specifications, warranty documents, and inspection reports. Photograph your completed roof from multiple angles, establishing baseline conditions for future comparison.
Most shingle manufacturers offer material warranties covering defects for 25-50 years, while workmanship warranties from contractors typically span 1-10 years. Understanding what each warranty covers-and doesn't cover-prevents surprises when problems arise. Storm damage, improper maintenance, and normal wear typically fall outside warranty protection.
Establishing Ongoing Maintenance Programs
Regular professional inspections complement your own monitoring efforts. Schedule biannual evaluations with qualified contractors who can identify subtle problems invisible to untrained eyes. These preventive visits cost significantly less than emergency repairs while catching issues at early, manageable stages.
Consider maintenance agreements that bundle inspections with minor repairs like flashing adjustments, sealant renewal, and gutter cleaning. These programs ensure my roof receives consistent attention while spreading costs across manageable monthly payments.
Tree management significantly impacts roof longevity. Trim branches extending within six feet of my roof to prevent rubbing damage during wind events and reduce debris accumulation. Falling branches during storms cause obvious damage, but constant contact from swaying limbs gradually wears protective granules and creates entry points for moisture.
Understanding Insurance Claims for Roof Damage
Storm damage often triggers insurance claims, requiring careful documentation and understanding of coverage limits. Knowing how to navigate this process protects your financial interests while ensuring my roof receives necessary repairs.
Documenting Damage for Insurance Purposes
Photograph damage immediately after discovering it, capturing wide shots showing overall impact and close-ups detailing specific problems. Document dates and times of storm events that caused damage. Compare current conditions to pre-storm photographs if available.
Contact your insurance company promptly to report potential claims. Adjusters typically inspect within days to assess damage extent and determine coverage. Having detailed documentation supports your claim and prevents disputes about damage timing or causation.
Working with contractors experienced in storm damage insurance claims streamlines the process. These professionals understand adjuster requirements and can identify damage that untrained eyes might miss, ensuring comprehensive repairs rather than partial fixes.
Understanding Coverage Limitations
Review your policy to understand deductibles, depreciation factors, and coverage limits. Replacement cost coverage pays full repair expenses using current materials, while actual cash value policies deduct depreciation based on age, potentially leaving significant out-of-pocket costs.
Some policies exclude certain damage types or impose special requirements for older roofs. Knowing these limitations before storms strike allows you to make informed decisions about additional coverage or planned replacements.
Planning for Future Roof Needs
Strategic planning helps you prepare financially and logistically for eventual replacement. Even well-maintained roofing systems eventually require replacement as materials reach their design lifespan.
Budgeting for Replacement
Setting aside funds annually for future replacement prevents financial stress when my roof reaches end-of-life. Divide estimated replacement cost by expected remaining years to calculate annual savings targets. For example, if replacement will cost $15,000 in ten years, saving $1,500 annually creates a dedicated fund covering this inevitable expense.
Consider how roof replacement integrates with other home improvement plans. Coordinating roof work with siding updates or gutter replacement may offer efficiency advantages and contractor discounts.
Enhancing Performance Through Upgrades
Replacement presents opportunities to enhance my roof's performance beyond original specifications. Upgrading from three-tab to architectural shingles improves durability and appearance. Adding ice and water shield in valleys and along eaves prevents ice dam damage. Improved ventilation systems protect against moisture and temperature extremes.
Energy-efficient materials reduce cooling costs during summer months. Reflective shingles or metal roofing deflect solar radiation, maintaining cooler attic temperatures and reducing air conditioning loads. Some jurisdictions offer tax credits or rebates for energy-efficient roofing installations, offsetting higher initial costs.
Protecting my roof requires consistent attention, informed decision-making, and timely professional intervention when problems exceed DIY capabilities. By implementing regular inspection schedules, addressing issues promptly, and working with qualified contractors, you ensure this critical system delivers decades of reliable performance. Whether you need routine maintenance, storm damage assessment, or complete replacement, Great Roofing brings family-owned dedication and professional expertise to every project, helping Joliet-area property owners protect their most valuable investments with quality workmanship and lasting results.